Get-Start Docker
在接下来的分享中,重点分享六个方面的内容: 1. 介绍Docker 2. 构建并运行第一个Docker容器 3. 将APP转换为一个扩展服务 4. 将服务扩展至多个服务集群 5. 添加一个永久保存的访问计时器 6. 将集群部署至生产环境
示例中的应用程序非常的简单,因此读者不必纠结于程序本身的代码. 事实上,这与Docker的理念是相同的。Docker更关注如何构建,发布以及运行应用程序,具体应用程序的复杂度,Docker是毫不关心的。
概念介绍
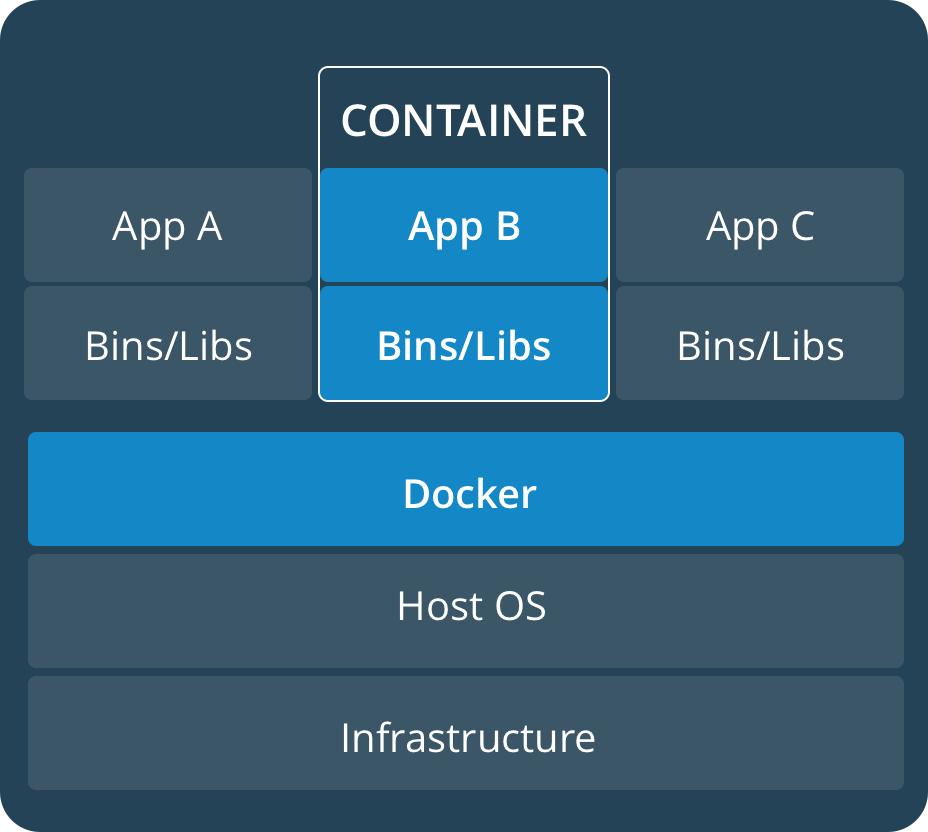
- image:镜像是一个轻量级的、独立的、可执行的包,它包含运行一个软件所需的所有东西,包括代码、运行时、库、环境变量和配置文件。
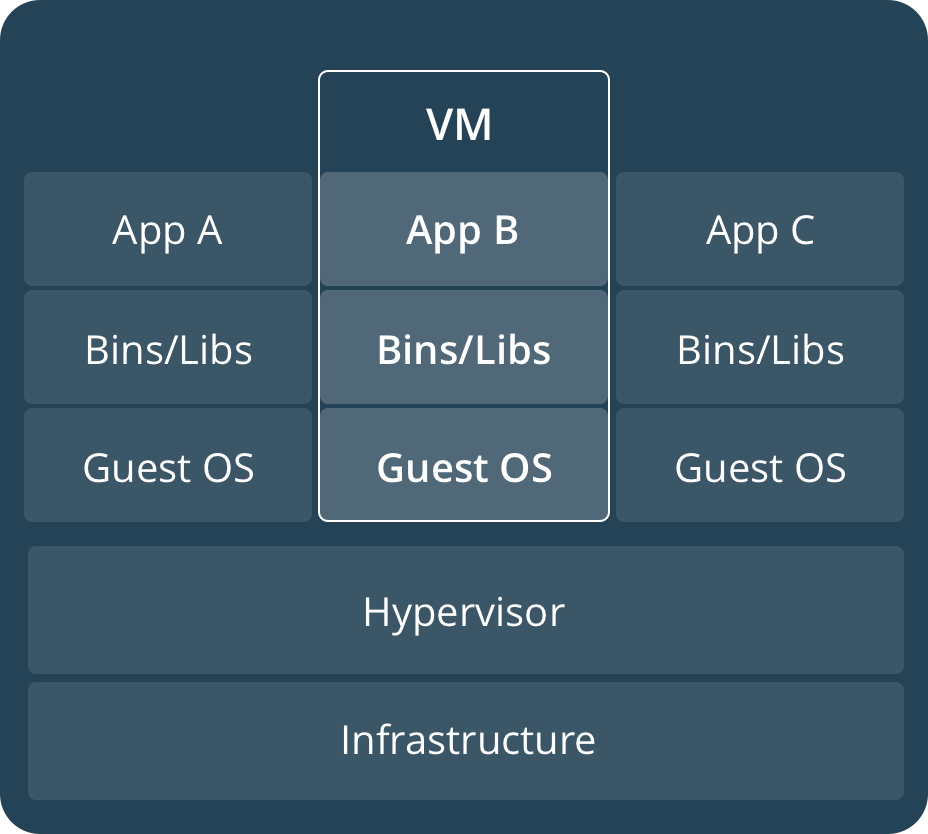
- Container 容器是一个映像的运行时实例,当实际执行时,映像会在内存中出现。默认情况下,它与主机环境完全隔离,只有在配置时才访问主机文件和端口。
新的开发环境
在过去,如果您开始编写一个Python应用程序,那么您的第一项业务就是在您的机器上安装一个Python运行时。但是,这就产生了这样一种情况,你的机器上的环境必须是这样才能让你的应用程序按照预期运行;运行应用程序的服务器也是如此。
使用Docker,您可以只获取一个可移植的Python运行时作为映像,不需要安装。然后,您的构建可以在应用程序代码旁边包含基本的Python映像,确保您的应用程序、它的依赖项和运行时都可以一起旅行。
这些可移植的图像是由一个叫做Dockerfile的东西定义的.
使用Dockerfile定义容器
Dockerfile 定义了容器的内容。下面我们将使用一个简单的例子,学习下容器的创建过程。
首先,创建一个空白的目录,并创建名称为Dockerfile的文件,然后将如下内容复制到该文件中。
# Use an official Python runtime as a parent image
FROM python:2.7-slim

# Set the working directory to /app
WORKDIR /app

# Copy the current directory contents into the container at /app
ADD . /app

# Install any needed packages specified in requirements.txt
RUN pip install --trusted-host pypi.python.org -r requirements.txt

# Make port 80 available to the world outside this container
EXPOSE 80

# Define environment variable
ENV NAME World

# Run app.py when the container launches
CMD ["python", "app.py"]
创建应用所需要的文件,requirements.txt 以及 app.py. 与Dockerfile放在相同的目录下。 这与我们的应用就创建完毕了。其中:
requirements.txt
Flask
Redis
app.py
from flask import Flask
from redis import Redis, RedisError
import os
import socket

# Connect to Redis
redis = Redis(host="redis", db=0, socket_connect_timeout=2, socket_timeout=2)

app = Flask(__name__)

@app.route("/")
def hello():
    try:
        visits = redis.incr("counter")
    except RedisError:
        visits = "<i>cannot connect to Redis, counter disabled</i>"

    html = "<h3>Hello {name}!</h3>" \
           "<b>Hostname:</b> {hostname}<br/>" \
           "<b>Visits:</b> {visits}"
    return html.format(name=os.getenv("NAME", "world"), hostname=socket.gethostname(), visits=visits)

if __name__ == "__main__":
    app.run(host='0.0.0.0', port=80)
构建APP
现在查看我们创建的文件:
root@cecgw:/home/cecgw/docker/docker-app# ls
app.py  Dockerfile  requirements.txt
现在可以运行docker命令,构建一个Docker镜像. 我们用-t命令标记该镜像。
docker build -t friendlyhello .
Sending build context to Docker daemon   5.12kB
Step 1/7 : FROM python:2.7-slim
2.7-slim: Pulling from library/python
c4bb02b17bb4: Pull complete
c5c896dce5ee: Pull complete
cf210b898cc6: Downloading [===>                                               ]    983kB/14.93MB
5117cef49bdb: Download complete

cf210b898cc6: Pull complete
5117cef49bdb: Pull complete
Digest: sha256:22112f2295fe9ea84b72e5344af73a2580a47b1014a1f4c58eccf6095b7ea18f
Status: Downloaded newer image for python:2.7-slim
 ---> 4fd30fc83117
Step 2/7 : WORKDIR /app
Removing intermediate container 44556fde19fe
 ---> 8fa21018e0be
Step 3/7 : ADD . /app
 ---> f110d6b4a4ea
Step 4/7 : RUN pip install --trusted-host pypi.python.org -r requirements.txt
 ---> Running in 1d0e54fa8dfc
Collecting Flask (from -r requirements.txt (line 1))
  Downloading Flask-0.12.2-py2.py3-none-any.whl (83kB)
Collecting Redis (from -r requirements.txt (line 2))
  Downloading redis-2.10.6-py2.py3-none-any.whl (64kB)
Collecting itsdangerous>=0.21 (from Flask->-r requirements.txt (line 1))
  Downloading itsdangerous-0.24.tar.gz (46kB)
Collecting Jinja2>=2.4 (from Flask->-r requirements.txt (line 1))
  Downloading Jinja2-2.10-py2.py3-none-any.whl (126kB)
Collecting Werkzeug>=0.7 (from Flask->-r requirements.txt (line 1))
  Downloading Werkzeug-0.14.1-py2.py3-none-any.whl (322kB)
Collecting click>=2.0 (from Flask->-r requirements.txt (line 1))
  Downloading click-6.7-py2.py3-none-any.whl (71kB)
Collecting MarkupSafe>=0.23 (from Jinja2>=2.4->Flask->-r requirements.txt (line 1))
  Downloading MarkupSafe-1.0.tar.gz
Building wheels for collected packages: itsdangerous, MarkupSafe
  Running setup.py bdist_wheel for itsdangerous: started
  Running setup.py bdist_wheel for itsdangerous: finished with status 'done'
  Stored in directory: /root/.cache/pip/wheels/fc/a8/66/24d655233c757e178d45dea2de22a04c6d92766abfb741129a
  Running setup.py bdist_wheel for MarkupSafe: started
  Running setup.py bdist_wheel for MarkupSafe: finished with status 'done'
  Stored in directory: /root/.cache/pip/wheels/88/a7/30/e39a54a87bcbe25308fa3ca64e8ddc75d9b3e5afa21ee32d57
Successfully built itsdangerous MarkupSafe
Installing collected packages: itsdangerous, MarkupSafe, Jinja2, Werkzeug, click, Flask, Redis
Successfully installed Flask-0.12.2 Jinja2-2.10 MarkupSafe-1.0 Redis-2.10.6 Werkzeug-0.14.1 click-6.7 itsdangerous-0.24
Removing intermediate container 1d0e54fa8dfc
 ---> 964c9a2ff5ac
Step 5/7 : EXPOSE 80
 ---> Running in f136af4ed15f
Removing intermediate container f136af4ed15f
 ---> 9fe081fc05a0
Step 6/7 : ENV NAME World
 ---> Running in ae4dee9777e3
Removing intermediate container ae4dee9777e3
 ---> 9de5dff3a988
Step 7/7 : CMD ["python", "app.py"]
 ---> Running in 61a41aa26178
Removing intermediate container 61a41aa26178
 ---> e8aafca68713
Successfully built e8aafca68713
Successfully tagged friendlyhello:latest
运行容器
执行DOCKER运行命令,前台执行命令:
docker run -p 4000:80 friendlyhello
后台执行命令:
docker run -d -p 4000:80 friendlyhello
查看容器运行状态:
# docker container ls
CONTAINER ID        IMAGE               COMMAND             CREATED             STATUS              PORTS                  NAMES
621fa271fc72        friendlyhello       "python app.py"     44 seconds ago      Up 43 seconds       0.0.0.0:4000->80/tcp   jovial_morse
结束容器运行命令:
# docker container stop 621fa271fc72
  621fa271fc72
容器运行成功后,可以访问浏览器,http://ip:4000,可以查看浏览器响应。也可以在本地使用 curl命令进行查看。
# curl http://localhost:4000
<h3>Hello World!</h3><b>Hostname:</b> 598cc14f4c28<br/><b>Visits:</b> <i>cannot connect to Redis, counter disabled</i>
分享镜像
测试成功后,我们可以将我们制作的镜像上传至云端。前提是需要到官网上进行注册。 注册地址.
- 本地登录
- 注册后,在本地终端进行登录:
root@cecgw:/home/cecgw/github/readme/source# docker login
Login with your Docker ID to push and pull images from Docker Hub. If you don't have a Docker ID, head over to https://hub.docker.com to create one.
Username: oneandonly
Password:
Login Succeeded
- 标注镜像
- 终端执行命令如下:
# docker tag friendlyhello oneandonly/friendlyhello-2018.1.25
终端查看标记过的镜像:
# docker image list
REPOSITORY                           TAG                 IMAGE ID            CREATED             SIZE
friendlyhello                        latest              e8aafca68713        2 hours ago         148MB
oneandonly/friendlyhello-2018.1.25   latest              e8aafca68713        2 hours ago         148MB
python                               2.7-slim            4fd30fc83117        6 weeks ago         138MB
hello-world                          latest              f2a91732366c        2 months ago        1.85kB
- 发布镜像
- 终端执行如下命令:
# docker push oneandonly/friendlyhello-2018.1.25
The push refers to repository [docker.io/oneandonly/friendlyhello-2018.1.25]
bf01cd042702: Pushed
baa35828d3ce: Pushed
63bfc4b63764: Pushed
94b0b6f67798: Mounted from library/python
e0c374004259: Mounted from library/python
56ee7573ea0f: Mounted from library/python
cfce7a8ae632: Mounted from library/python
latest: digest: sha256:beb1aac4e2df9da53e89c0fc4deb90d7224464734f3ce1a1545b7d08af13b3fc size: 1787
如果该映像在本地无法使用,那么Docker将从存储库中拉出它。 执行命令为:
docker run -p 4000:80 oneandonly/friendlyhello-2018.1.25
无论 docker run 命令在哪里执行,它都会拉出镜像,并包含响应的python环境,以及requirements里的依赖。并运行的代码。它都是在一个整洁的小包裹里一起旅行的,而且主机不需要安装任何东西,而只是Docker来运行它。
Docker 服务
前面已经介绍了容器的内容,现在介绍下Services.
在分布式应用中,不同的组件提供不同的服务。服务实际上只是“生产中的容器”。“一个服务只运行一个镜像,但是它将图像的运行方式,如应该使用的端口、应该运行多少个容器的副本、以便服务具有它需要的容量等等进行了整理。扩展服务会改变运行该软件的容器实例的数量,在流程中为服务分配更多的计算资源
。
通过docker实现服务的定义、运行以及扩展非常便利。只需要编写一个 docker-compose.yml 文件即可。
docker-compose.yml 文件定义了Docker容器的在生成中的行为。
我们定义如下docker-compose.yml 文件.
version: "3"
services:
  web:
    # replace username/repo:tag with your name and image details
    image: oneandonly/friendlyhello-2018.1.25
    deploy:
      replicas: 5
      resources:
        limits:
          cpus: "0.1"
          memory: 50M
      restart_policy:
        condition: on-failure
    ports:
      - "80:80"
    networks:
      - webnet
networks:
  webnet:
改文件在docker平台上执行后,会做出如下动作:
- 从Docker云端将image镜像进行下载;
- 运行5个镜像实例作为服务,服务名称为
web. 规定每一个容器最多只能使用10% CPU, 50M内存. - 如果出现故障,立即重启Docker;
- 映射host与服务
web端口为 80:80. - 将5个containers通过负载均衡网络webnet共享80端口。在容器内部,通过一个临时端口发布到web服务的80端口。
- 定义webnet网络,使用默认的设置.
运行新的负载均衡APP
1. 终端执行 docker swarm init –advertise-addr br-ex .. code-block:: console
# docker swarm init –advertise-addr br-ex Swarm initialized: current node (crn8foamx5e8io1ff5n22ofo2) is now a manager.
To add a worker to this swarm, run the following command:
docker swarm join –token SWMTKN-1-3fhsrnwgs36nqgv4yce62rmqsmifbxcya4q0obllmwbvpuvznd-3d47jfab15ocbqea003ho6c7f 192.168.246.132:2377To add a manager to this swarm, run ‘docker swarm join-token manager’ and follow the instructions.
- 终端执行 docker stack deploy -c docker-compose.yml getstartedlab 需要给运行的APP一个名字,此名字定义为getstartedlab:
docker stack deploy -c docker-compose.yml getstartedlab
Creating network getstartedlab_webnet
Creating service getstartedlab_web
这样,我们的一个服务栈已经运行了5个容器实例,在同一个物理服务器中.
- 查看服务.docker service ls
root@cecgw:/home/cecgw/docker# docker service ls
ID                  NAME                MODE                REPLICAS            IMAGE                                       PORTS
lvk1pm89vphp        getstartedlab_web   replicated          5/5                 oneandonly/friendlyhello-2018.1.25:latest   *:80->80/tcp
终端查看docker容器状态。 docker container list
root@cecgw:/home/cecgw/docker# docker container list
CONTAINER ID        IMAGE                                       COMMAND             CREATED             STATUS              PORTS               NAMES
36e0ee067b48        oneandonly/friendlyhello-2018.1.25:latest   "python app.py"     8 seconds ago       Up 2 seconds        80/tcp              getstartedlab_web.5.dknj99kg8z27tmcmr5d3stl37
571267336cfb        oneandonly/friendlyhello-2018.1.25:latest   "python app.py"     18 seconds ago      Up 7 seconds        80/tcp              getstartedlab_web.3.zt9nqi5u1tgu2kqcyytzh056c
8c2bb1d05b28        oneandonly/friendlyhello-2018.1.25:latest   "python app.py"     33 seconds ago      Up 17 seconds       80/tcp              getstartedlab_web.4.y5m10kvjhhybgi7ceephy70sv
d0d9cd2d925d        oneandonly/friendlyhello-2018.1.25:latest   "python app.py"     41 seconds ago      Up 32 seconds       80/tcp              getstartedlab_web.2.p7a0dwxjn4d4ans3yihnbugss
a94bea1c0879        oneandonly/friendlyhello-2018.1.25:latest   "python app.py"     52 seconds ago      Up 41 seconds       80/tcp
安装方式包括两种,一种为APT安装,一种是通过DEB包安装。
APT安装
deb包安装
用户可以到 Docker源选取合适的包下载安装. 下载后,使用如下命令进行安装:
root@cecgw:/home/cecgw# dpkg -i docker-ce_17.12.0~ce-0~ubuntu_amd64.deb
首次执行后,发现出现报错信息如下:
root@cecgw:/home/cecgw#  dpkg -i docker-ce_17.12.0~ce-0~ubuntu_amd64.deb
(Reading database ... 134914 files and directories currently installed.)
Preparing to unpack docker-ce_17.12.0~ce-0~ubuntu_amd64.deb ...
Unpacking docker-ce (17.12.0~ce-0~ubuntu) over (17.12.0~ce-0~ubuntu) ...
dpkg: dependency problems prevent configuration of docker-ce:
docker-ce depends on libsystemd-journal0 (>= 201); however:
Package libsystemd-journal0 is not installed.

dpkg: error processing package docker-ce (--install):
dependency problems - leaving unconfigured
Processing triggers for ureadahead (0.100.0-16) ...
Processing triggers for man-db (2.6.7.1-1ubuntu1) ...
Errors were encountered while processing:
docker-ce
发现系统中缺少依赖,关于依赖的问题,确实是在软件部署及升级过程中,非常头痛的问题,Docker也是在着重解决该问题。
Note
这里给大家普及下,如何找到相关的依赖,站点 https://pkgs.org/ 中提供了linux中大部分的软件包, 大家可以在此网站上,选取适合自己的操作系统版本,并搜索下载相关的软件包。
下载完成后,先安装相关的依赖,然后完成Docker相关的软件安装即可。我们查看系统用户组,/etc/group`发现多出系统用户组docker,但查看/etc/passwd`,并没有发现多出docker用户。
下载完成后,我们可以使用如下命令验证Docker安装是否成功:
docker run hello-world
Unable to find image 'hello-world:latest' locally
latest: Pulling from library/hello-world
ca4f61b1923c: Pull complete
Digest: sha256:66ef312bbac49c39a89aa9bcc3cb4f3c9e7de3788c944158df3ee0176d32b751
Status: Downloaded newer image for hello-world:latest

Hello from Docker!
This message shows that your installation appears to be working correctly.

To generate this message, Docker took the following steps:
 1. The Docker client contacted the Docker daemon.
 2. The Docker daemon pulled the "hello-world" image from the Docker Hub.
    (amd64)
 3. The Docker daemon created a new container from that image which runs the
    executable that produces the output you are currently reading.
 4. The Docker daemon streamed that output to the Docker client, which sent it
    to your terminal.

To try something more ambitious, you can run an Ubuntu container with:
 $ docker run -it ubuntu bash

Share images, automate workflows, and more with a free Docker ID:
 https://cloud.docker.com/

For more examples and ideas, visit:
 https://docs.docker.com/engine/userguide/
该命令,将下载一个测试镜像,并且启动容器;该测试容器将打印Hello from Docker. 并且退出,似乎我们已经运行了一个容器,但对于其原理及用途扔不是很清晰。带着疑问继续研究。 具体到Docker自身,我们需要观察,Docker运行的一些基本元素,比如,是否只有root用户权限可操作?是否绑定系统端口?是否跟随系统自启动?等一系列的问题,这个将在随后的章节给出答案。
卸载DOCKER CE
- 卸载相关软件包:
# sudo apt-get purge docker-ce
- 删除相关的镜像,容器,卷:
# sudo rm -rf /var/lib/docker
end-21