horizon+keystone+ceilometer
FYVERSION HBTWY.
如何构建及验证
环境准备:ubuntu 18.04 server 依赖开源:openstack
root@ubuntu:/home/ubuntu# apt-get update # 更新源
root@ubuntu:/etc/apt# add-apt-repository cloud-archive:rocky # 增加openstack 社区源
root@ubuntu: apt-get update && apt-get dist-upgrade  # 更新 等待时间较长
root@ubuntu: apt install python-openstackclient  # 按装openstack 客户端(sdk)
root@ubuntu:/etc/apt# apt install mariadb-server python-pymysql # 安装mysql
root@ubuntu:/etc/apt# touch /etc/mysql/mariadb.conf.d/99-openstack.cnf # 创建mysql openstack 配置文件
root@ubuntu:/etc/apt# vi /etc/mysql/mariadb.conf.d/99-openstack.cnf
 [mysqld]
 bind-address = 0.0.0.0

 default-storage-engine = innodb
 innodb_file_per_table = on
 max_connections = 4096
 collation-server = utf8_general_ci
 character-set-server = utf8
 # add the following info
root@ubuntu:/etc/apt# service mysql restart# 重启Mysql

root@ubuntu:/etc/apt# mysql_secure_installation
>>>>>>>>>>>>>>>>>>>>>>>>>>>>>>>>>>>>>>>>>>>>>>>>>>>>>>>>>>>>>>>>>>>>>>>>>>
NOTE: RUNNING ALL PARTS OF THIS SCRIPT IS RECOMMENDED FOR ALL MariaDB
     SERVERS IN PRODUCTION USE!  PLEASE READ EACH STEP CAREFULLY!

In order to log into MariaDB to secure it, we'll need the current
password for the root user.  If you've just installed MariaDB, and
you haven't set the root password yet, the password will be blank,
so you should just press enter here.

Enter current password for root (enter for none):
       OK, successfully used password, moving on...

       Setting the root password ensures that nobody can log into the MariaDB
       root user without the proper authorisation.

       Set root password? [Y/n] y
       New password:
       Re-enter new password:
       Password updated successfully!
       Reloading privilege tables..
        ... Success!


       By default, a MariaDB installation has an anonymous user, allowing anyone
       to log into MariaDB without having to have a user account created for
       them.  This is intended only for testing, and to make the installation
       go a bit smoother.  You should remove them before moving into a
       production environment.

       Remove anonymous users? [Y/n] y
        ... Success!

       Normally, root should only be allowed to connect from 'localhost'.  This
       ensures that someone cannot guess at the root password from the network.

       Disallow root login remotely? [Y/n] n
        ... skipping.

       By default, MariaDB comes with a database named 'test' that anyone can
       access.  This is also intended only for testing, and should be removed
       before moving into a production environment.

       Remove test database and access to it? [Y/n] y
        - Dropping test database...
        ... Success!
        - Removing privileges on test database...
        ... Success!

       Reloading the privilege tables will ensure that all changes made so far
       will take effect immediately.

       Reload privilege tables now? [Y/n] y
        ... Success!

        Cleaning up...

        All done!  If you've completed all of the above steps, your MariaDB
        installation should now be secure.

        Thanks for using MariaDB!
   >>>>>>>>>>>>>>>>>>>>>>>>>>>>>>>>>>>>>>>>>>>>>>>>>>>>>>>>>>>>>>.

root@ubuntu:/home/ubuntu# apt install rabbitmq-server # 安装rabitmq-server. 分布式消息队列 单机版本.
root@ubuntu:/home/ubuntu# rabbitmqctl add_user openstack 1qaz2wsx # add openstack user 供消息队列用户认证使用.
Creating user "openstack"
root@ubuntu:/home/ubuntu# rabbitmqctl set_permissions openstack ".*" ".*" ".*" #使openstack 用户具有接入根权限.
Setting permissions for user "openstack" in vhost "/"
root@ubuntu:/home/ubuntu# apt install memcached python-memcache # 安装memcached 用于缓存数据使用,比如keystone token.提高访问速度.
root@ubuntu:/home/ubuntu# service memcached restart

>>>>>>>>>>> keystone install >>>>>>>>>>>>>>>>>>>>>>>>>>>>>>>>>>>.
root@ubuntu:/home/ubuntu# mysql # 创建keystone 数据库并赋予用户权限.
       Welcome to the MariaDB monitor.  Commands end with ; or \g.
       Your MariaDB connection id is 30
       Server version: 10.1.43-MariaDB-0ubuntu0.18.04.1 Ubuntu 18.04

       Copyright (c) 2000, 2018, Oracle, MariaDB Corporation Ab and others.

       Type 'help;' or '\h' for help. Type '\c' to clear the current input statement.

       MariaDB [(none)]> CREATE DATABASE keystone;
       MariaDB [keystone]>  GRANT ALL PRIVILEGES ON keystone.* TO 'keystone'@'localhost' \
           -> IDENTIFIED BY '1qaz2wsx';
       Query OK, 0 rows affected (0.00 sec)

       MariaDB [keystone]>  GRANT ALL PRIVILEGES ON keystone.* TO 'keystone'@'%' \
           -> IDENTIFIED BY '1qaz2wsx';
       Query OK, 0 rows affected (0.00 sec)
       MariaDB [mysql]> use mysql
       MariaDB [mysql]> UPDATE user SET plugin='mysql_native_password' WHERE user='keystone';
       MariaDB [mysql]> FLUSH PRIVILEGES;

       MariaDB [keystone]> quit
       Bye
root@ubuntu:/home/ubuntu# apt install keystone  apache2 libapache2-mod-wsgi # 安装keystone需要的软件包
root@ubuntu:/home/ubuntu# vi /etc/keystone/keystone.conf  # 做一个最基本的配置.
root@ubuntu:/home/ubuntu# grep -vE  '^#|^$' /etc/keystone/keystone.conf  # 做最基本配置.keystone 配置项众多,值得研究.
       [DEFAULT]
       log_dir = /var/log/keystone
       [application_credential]
       [assignment]
       [auth]
       [cache]
       [catalog]
       [cors]
       [credential]
       [database]
       connection = mysql+pymysql://keystone:1qaz2wsx@localhost/keystone # 配置链接数据库认证方式.
       [domain_config]
       [endpoint_filter]
       [endpoint_policy]
       [eventlet_server]
       [extra_headers]
       Distribution = Ubuntu
       [federation]
       [fernet_tokens]
       [healthcheck]
       [identity]
       [identity_mapping]
       [ldap]
       [matchmaker_redis]
       [memcache]
       [oauth1]
       [oslo_messaging_amqp]
       [oslo_messaging_kafka]
       [oslo_messaging_notifications]
       [oslo_messaging_rabbit]
       [oslo_messaging_zmq]
       [oslo_middleware]
root@ubuntu:/home/ubuntu# su -s /bin/sh -c "keystone-manage db_sync" keystone #生成数据库表.
       [oslo_policy]
       [policy]
       [profiler]
       [resource]
       [revoke]
       [role]
       [saml]
       [security_compliance]
       [shadow_users]
       [signing]
       [token]
       provider = fernet # 配置最基本的token认证方式,我们这里选择uuid. 目前keystone 支持4类认证.包括 uuid,fernet,pki,pkiz供用户选择.感兴趣的可以分析清楚. 之前的版本均采用uuid,有一点问题,后来版本均采用fernet.
       [tokenless_auth]
       [trust]
       [unified_limit]
       [wsgi]

root@ubuntu:/home/ubuntu# su -s /bin/sh -c "keystone-manage db_sync" keystone
>>>>>>>>>>>>>>>>>>>>>>>>>>>>>>>>>>>>>>>>>>>>>>>>>>>>>>>>>>>>>>>>>>>>>>>.
tail -f /var/log/keystone/keystone-manage.log

       2020-01-13 18:01:18.543 7848 INFO migrate.versioning.api [-] done
       2020-01-13 18:01:18.543 7848 INFO migrate.versioning.api [-] 50 -> 51...
       2020-01-13 18:01:18.552 7848 INFO migrate.versioning.api [-] done
       2020-01-13 18:01:18.552 7848 INFO migrate.versioning.api [-] 51 -> 52...
       2020-01-13 18:01:18.561 7848 INFO migrate.versioning.api [-] done
       2020-01-13 18:01:18.587 7848 INFO migrate.versioning.api [-] 0 -> 1...
       2020-01-13 18:01:18.591 7848 INFO migrate.versioning.api [-] done
       2020-01-13 18:01:18.591 7848 INFO migrate.versioning.api [-] 1 -> 2...
       2020-01-13 18:01:18.853 7848 INFO migrate.versioning.api [-] done
       2020-01-13 18:01:18.854 7848 INFO migrate.versioning.api [-] 2 -> 3...
       2020-01-13 18:01:19.211 7848 INFO migrate.versioning.api [-] done
       2020-01-13 18:01:19.211 7848 INFO migrate.versioning.api [-] 3 -> 4...
       2020-01-13 18:01:19.571 7848 INFO migrate.versioning.api [-] done
       2020-01-13 18:01:19.572 7848 INFO migrate.versioning.api [-] 4 -> 5...
       2020-01-13 18:01:19.581 7848 INFO migrate.versioning.api [-] done
       2020-01-13 18:01:19.582 7848 INFO migrate.versioning.api [-] 5 -> 6...
       2020-01-13 18:01:19.589 7848 INFO migrate.versioning.api [-] done
       2020-01-13 18:01:19.589 7848 INFO migrate.versioning.api [-] 6 -> 7...
       2020-01-13 18:01:19.597 7848 INFO migrate.versioning.api [-] done
       2020-01-13 18:01:19.598 7848 INFO migrate.versioning.api [-] 7 -> 8...
       2020-01-13 18:01:19.607 7848 INFO migrate.versioning.api [-] done
       2020-01-13 18:01:19.607 7848 INFO migrate.versioning.api [-] 8 -> 9...
       2020-01-13 18:01:19.616 7848 INFO migrate.versioning.api [-] done
       2020-01-13 18:01:19.617 7848 INFO migrate.versioning.api [-] 9 -> 10...
       2020-01-13 18:01:19.625 7848 INFO migrate.versioning.api [-] done
       2020-01-13 18:01:19.625 7848 INFO migrate.versioning.api [-] 10 -> 11...
       2020-01-13 18:01:19.712 7848 INFO migrate.versioning.api [-] done
       2020-01-13 18:01:19.714 7848 INFO migrate.versioning.api [-] 11 -> 12...
       2020-01-13 18:01:19.837 7848 INFO migrate.versioning.api [-] done
       2020-01-13 18:01:19.839 7848 INFO migrate.versioning.api [-] 12 -> 13...
       2020-01-13 18:01:20.111 7848 INFO migrate.versioning.api [-] done
       2020-01-13 18:01:20.113 7848 INFO migrate.versioning.api [-] 13 -> 14...
       2020-01-13 18:01:20.643 7848 INFO migrate.versioning.api [-] done
       2020-01-13 18:01:20.644 7848 INFO migrate.versioning.api [-] 14 -> 15...
       2020-01-13 18:01:20.801 7848 INFO migrate.versioning.api [-] done
       2020-01-13 18:01:20.804 7848 INFO migrate.versioning.api [-] 15 -> 16...
       2020-01-13 18:01:20.822 7848 INFO migrate.versioning.api [-] done
       2020-01-13 18:01:20.824 7848 INFO migrate.versioning.api [-] 16 -> 17...
       2020-01-13 18:01:20.839 7848 INFO migrate.versioning.api [-] done
       2020-01-13 18:01:20.840 7848 INFO migrate.versioning.api [-] 17 -> 18...
       2020-01-13 18:01:20.846 7848 INFO migrate.versioning.api [-] done
       2020-01-13 18:01:20.847 7848 INFO migrate.versioning.api [-] 18 -> 19...
       2020-01-13 18:01:20.855 7848 INFO migrate.versioning.api [-] done
       2020-01-13 18:01:20.856 7848 INFO migrate.versioning.api [-] 19 -> 20...
       2020-01-13 18:01:20.864 7848 INFO migrate.versioning.api [-] done
       2020-01-13 18:01:20.865 7848 INFO migrate.versioning.api [-] 20 -> 21...
       2020-01-13 18:01:20.873 7848 INFO migrate.versioning.api [-] done
       2020-01-13 18:01:20.874 7848 INFO migrate.versioning.api [-] 21 -> 22...
       2020-01-13 18:01:20.883 7848 INFO migrate.versioning.api [-] done
       2020-01-13 18:01:20.884 7848 INFO migrate.versioning.api [-] 22 -> 23...
       2020-01-13 18:01:20.891 7848 INFO migrate.versioning.api [-] done
       2020-01-13 18:01:20.892 7848 INFO migrate.versioning.api [-] 23 -> 24...
       2020-01-13 18:01:21.016 7848 INFO migrate.versioning.api [-] done
       2020-01-13 18:01:21.017 7848 INFO migrate.versioning.api [-] 24 -> 25...
       2020-01-13 18:01:21.027 7848 INFO migrate.versioning.api [-] done
       2020-01-13 18:01:21.028 7848 INFO migrate.versioning.api [-] 25 -> 26...
       2020-01-13 18:01:21.039 7848 INFO migrate.versioning.api [-] done
       2020-01-13 18:01:21.040 7848 INFO migrate.versioning.api [-] 26 -> 27...
       2020-01-13 18:01:21.051 7848 INFO migrate.versioning.api [-] done
       2020-01-13 18:01:21.052 7848 INFO migrate.versioning.api [-] 27 -> 28...
       2020-01-13 18:01:21.062 7848 INFO migrate.versioning.api [-] done
       2020-01-13 18:01:21.063 7848 INFO migrate.versioning.api [-] 28 -> 29...
       2020-01-13 18:01:21.073 7848 INFO migrate.versioning.api [-] done
       2020-01-13 18:01:21.075 7848 INFO migrate.versioning.api [-] 29 -> 30...
       2020-01-13 18:01:21.083 7848 INFO migrate.versioning.api [-] done
       2020-01-13 18:01:21.084 7848 INFO migrate.versioning.api [-] 30 -> 31...
       2020-01-13 18:01:21.092 7848 INFO migrate.versioning.api [-] done
       2020-01-13 18:01:21.092 7848 INFO migrate.versioning.api [-] 31 -> 32...
       2020-01-13 18:01:21.121 7848 INFO migrate.versioning.api [-] done
       2020-01-13 18:01:21.121 7848 INFO migrate.versioning.api [-] 32 -> 33...
       2020-01-13 18:01:21.130 7848 INFO migrate.versioning.api [-] done
       2020-01-13 18:01:21.130 7848 INFO migrate.versioning.api [-] 33 -> 34...
       2020-01-13 18:01:21.142 7848 INFO migrate.versioning.api [-] done
       2020-01-13 18:01:21.143 7848 INFO migrate.versioning.api [-] 34 -> 35...
       2020-01-13 18:01:21.270 7848 INFO migrate.versioning.api [-] done
       2020-01-13 18:01:21.272 7848 INFO migrate.versioning.api [-] 35 -> 36...
       2020-01-13 18:01:21.400 7848 INFO migrate.versioning.api [-] done
       2020-01-13 18:01:21.402 7848 INFO migrate.versioning.api [-] 36 -> 37...
       2020-01-13 18:01:21.441 7848 INFO migrate.versioning.api [-] done
       2020-01-13 18:01:21.441 7848 INFO migrate.versioning.api [-] 37 -> 38...
       2020-01-13 18:01:21.450 7848 INFO migrate.versioning.api [-] done
       2020-01-13 18:01:21.450 7848 INFO migrate.versioning.api [-] 38 -> 39...
       2020-01-13 18:01:21.459 7848 INFO migrate.versioning.api [-] done
       2020-01-13 18:01:21.460 7848 INFO migrate.versioning.api [-] 39 -> 40...
       2020-01-13 18:01:21.468 7848 INFO migrate.versioning.api [-] done
       2020-01-13 18:01:21.469 7848 INFO migrate.versioning.api [-] 40 -> 41...
       2020-01-13 18:01:21.477 7848 INFO migrate.versioning.api [-] done
       2020-01-13 18:01:21.477 7848 INFO migrate.versioning.api [-] 41 -> 42...
       2020-01-13 18:01:21.486 7848 INFO migrate.versioning.api [-] done
       2020-01-13 18:01:21.487 7848 INFO migrate.versioning.api [-] 42 -> 43...
       2020-01-13 18:01:21.495 7848 INFO migrate.versioning.api [-] done
       2020-01-13 18:01:21.496 7848 INFO migrate.versioning.api [-] 43 -> 44...
       2020-01-13 18:01:21.504 7848 INFO migrate.versioning.api [-] done
       2020-01-13 18:01:21.504 7848 INFO migrate.versioning.api [-] 44 -> 45...
       2020-01-13 18:01:21.513 7848 INFO migrate.versioning.api [-] done
       2020-01-13 18:01:21.514 7848 INFO migrate.versioning.api [-] 45 -> 46...
       2020-01-13 18:01:21.522 7848 INFO migrate.versioning.api [-] done
       2020-01-13 18:01:21.523 7848 INFO migrate.versioning.api [-] 46 -> 47...
       2020-01-13 18:01:21.635 7848 INFO migrate.versioning.api [-] done
       2020-01-13 18:01:21.636 7848 INFO migrate.versioning.api [-] 47 -> 48...
       2020-01-13 18:01:21.646 7848 INFO migrate.versioning.api [-] done
       2020-01-13 18:01:21.646 7848 INFO migrate.versioning.api [-] 48 -> 49...
       2020-01-13 18:01:21.654 7848 INFO migrate.versioning.api [-] done
       2020-01-13 18:01:21.654 7848 INFO migrate.versioning.api [-] 49 -> 50...
       2020-01-13 18:01:21.663 7848 INFO migrate.versioning.api [-] done
       2020-01-13 18:01:21.664 7848 INFO migrate.versioning.api [-] 50 -> 51...
       2020-01-13 18:01:21.672 7848 INFO migrate.versioning.api [-] done
       2020-01-13 18:01:21.672 7848 INFO migrate.versioning.api [-] 51 -> 52...
       2020-01-13 18:01:21.681 7848 INFO migrate.versioning.api [-] done
>>>>>>>>>>>>>>>>>>>>>>>>>>>>>>>>>>>>>>>>>>>>>>>>>>>>>>>>>>>>>>>>>>>>>>>>>>>>>>>>>>>>...
root@ubuntu:/home/ubuntu# keystone-manage bootstrap --bootstrap-password 1qaz2wsx \
>   --bootstrap-admin-url http://ubuntu:5000/v3/ \
>   --bootstrap-internal-url http://ubuntu:5000/v3/ \
>   --bootstrap-public-url http://ubuntu:5000/v3/ \
>   --bootstrap-region-id RegionOne # 生成keytone endpoint
MariaDB [keystone]> select * from endpoint;
+----------------------------------+--------------------+-----------+----------------------------------+------------------------+-------+---------+-----------+
| id                               | legacy_endpoint_id | interface | service_id                       | url                    | extra | enabled | region_id |
+----------------------------------+--------------------+-----------+----------------------------------+------------------------+-------+---------+-----------+
| 07f8a36af7194a9894a212d4729f383f | NULL               | internal  | 5d2199e6a4f643738f0a72f74da7f1fb | http://ubuntu:5000/v3/ | {}    |       1 | RegionOne |
| 93a8b806bc984b78addcc05ec6c2e014 | NULL               | admin     | 5d2199e6a4f643738f0a72f74da7f1fb | http://ubuntu:5000/v3/ | {}    |       1 | RegionOne |
| b18dd1dc9b0148ca97a1136bfc8f922e | NULL               | public    | 5d2199e6a4f643738f0a72f74da7f1fb | http://ubuntu:5000/v3/ | {}    |       1 | RegionOne |
+----------------------------------+--------------------+-----------+----------------------------------+------------------------+-------+---------+-----------+
3 rows in set (0.00 sec)
root@ubuntu:/etc/apache2# /etc/init.d/apache2 restart
[ ok ] Restarting apache2 (via systemctl): apache2.service.
root@ubuntu:/etc/apache2# touch /root/openstackrc
root@ubuntu:/etc/apache2# vi /root/openstackrc
export OS_USERNAME=admin
export OS_PASSWORD=1qaz2wsx
export OS_PROJECT_NAME=admin
export OS_USER_DOMAIN_NAME=Default
export OS_PROJECT_DOMAIN_NAME=Default
export OS_AUTH_URL=http://ubuntu:5000/v3
export OS_IDENTITY_API_VERSION=3

root@ubuntu:/etc/apache2# openstack domain create --description "An Example Domain" example #创建demain
+-------------+----------------------------------+
| Field       | Value                            |
+-------------+----------------------------------+
| description | An Example Domain                |
| enabled     | True                             |
| id          | 48edc71538d5434395a64889ff810042 |
| name        | example                          |
| tags        | []                               |
+-------------+----------------------------------+

       root@ubuntu:/etc/apache2# openstack project create --domain default \
       >   --description "Service Project" service
       +-------------+----------------------------------+
       | Field       | Value                            |
       +-------------+----------------------------------+
       | description | Service Project                  |
       | domain_id   | default                          |
       | enabled     | True                             |
       | id          | d4774cd79b4b476d92cc2518888f10b0 |
       | is_domain   | False                            |
       | name        | service                          |
       | parent_id   | default                          |
       | tags        | []                               |
       +-------------+----------------------------------+
       root@ubuntu:/etc/apache2# openstack project create --domain default \
       >   --description "Demo Project" fying
       +-------------+----------------------------------+
       | Field       | Value                            |
       +-------------+----------------------------------+
       | description | Demo Project                     |
       | domain_id   | default                          |
       | enabled     | True                             |
       | id          | 14d0668d8d5c4ed1b82a733ef8e446bf |
       | is_domain   | False                            |
       | name        | fying                            |
       | parent_id   | default                          |
       | tags        | []                               |
       +-------------+----------------------------------+
       root@ubuntu:/etc/apache2# openstack user create --domain default \
       >   --password-prompt fying
       User Password:
       Repeat User Password:
       +---------------------+----------------------------------+
       | Field               | Value                            |
       +---------------------+----------------------------------+
       | domain_id           | default                          |
       | enabled             | True                             |
       | id                  | c5607a5305fb4e73acf6376b77baa855 |
       | name                | fying                            |
       | options             | {}                               |
       | password_expires_at | None                             |
       +---------------------+----------------------------------+
       root@ubuntu:/etc/apache2# openstack role create admin
       Conflict occurred attempting to store role - Duplicate entry found with name admin. (HTTP 409) (Request-ID: req-49569d88-0b4b-48ba-b88e-f3ce0dcc2f01)
       root@ubuntu:/etc/apache2# openstack role create user
       +-----------+----------------------------------+
       | Field     | Value                            |
       +-----------+----------------------------------+
       | domain_id | None                             |
       | id        | 7605d1d1b98b41f9a5d920b68acd4978 |
       | name      | user                             |
       +-----------+----------------------------------+
       root@ubuntu:/etc/apache2# openstack role add --project fying --user myuser user
       No user with a name or ID of 'myuser' exists.
       root@ubuntu:/etc/apache2# openstack role add --project fying --user fying user

TEST 请求一个token.

       root@ubuntu:/etc/apache2#  openstack --os-auth-url http://ubuntu:5000/v3 \
       >   --os-project-domain-name Default --os-user-domain-name Default \
       >   --os-project-name admin --os-username admin token issue
       +------------+-----------------------------------------------------------------------------------------------------------------------------------------------------------------------------------------+
       | Field      | Value                                                                                                                                                                                   |
       +------------+-----------------------------------------------------------------------------------------------------------------------------------------------------------------------------------------+
       | expires    | 2020-01-13T11:47:45+0000                                                                                                                                                                |
       | id         | gAAAAABeHErRhnt9tZJc-5zV9ccM36TISGbFOSZ6VzY7ozWXL23RWP0TUwXhIi-qLgRYFYMUSvVKx3VGYae8QKL6LZ7nvE4h6zqznLnxsdSNazLKZzecSsus1u46pzb7YLpNpsmeZMP-J_1bjU7FDhLK97VQ5cPzBFIJZdao5WIGkE1eqmIBtK8 |
       | project_id | ee8ba2a1b05c4ea383bea1d1f8b0996d                                                                                                                                                        |
       | user_id    | 303212a7aea24e5194128f862a198667                                                                                                                                                        |
       +------------+-----------------------------------------------------------------------------------------------------------------------------------------------------------------------------------------+

       root@ubuntu:/etc/apache2# openstack token issue
       +------------+-----------------------------------------------------------------------------------------------------------------------------------------------------------------------------------------+
       | Field      | Value                                                                                                                                                                                   |
       +------------+-----------------------------------------------------------------------------------------------------------------------------------------------------------------------------------------+
       | expires    | 2020-01-13T11:48:46+0000                                                                                                                                                                |
       | id         | gAAAAABeHEsOW2kzsK1bhAO1mRA4Ibjt1TpG5LKQArSg2wnMg-Z9Qf1KEozw5SlDVDkW_lfCQL9PpNNdjBfdKylBgtJvNlpvJmXNnVnQWbVJznwIbH1pIMNfmO5H2iV1UEJzQhpk7xocLN7vemF4PEfOa6T1wBeWIqsWLfOSSHQUT_VhuitVYzo |
       | project_id | ee8ba2a1b05c4ea383bea1d1f8b0996d                                                                                                                                                        |
       | user_id    | 303212a7aea24e5194128f862a198667                                                                                                                                                        |
       +------------+-----------------------------------------------------------------------------------------------------------------------------------------------------------------------------------------+

       root@ubuntu:/etc/apache2# openstack service list # 列出服务信息,keystone,ceilometer,nova,nuetorn在keystone中都是一种服务,并且均有用户存在,同一由keystone service租户管理.
       +----------------------------------+----------+----------+
       | ID                               | Name     | Type     |
       +----------------------------------+----------+----------+
       | 5d2199e6a4f643738f0a72f74da7f1fb | keystone | identity |
       +----------------------------------+----------+----------+


       root@ubuntu:/etc/apache2# openstack user list # 列出该租户下的用户.
       +----------------------------------+-------+
       | ID                               | Name  |
       +----------------------------------+-------+
       | 303212a7aea24e5194128f862a198667 | admin |
       | c5607a5305fb4e73acf6376b77baa855 | fying |
       +----------------------------------+-------+

       root@ubuntu:/etc/apache2# openstack project list # 列出租户信息.
       +----------------------------------+---------+
       | ID                               | Name    |
       +----------------------------------+---------+
       | 14d0668d8d5c4ed1b82a733ef8e446bf | fying   |
       | d4774cd79b4b476d92cc2518888f10b0 | service |
       | ee8ba2a1b05c4ea383bea1d1f8b0996d | admin   |
       +----------------------------------+---------+

       root@ubuntu:/home/ubuntu# openstack endpoint list #列出服务入口,每一个组件(nova,keystone,ceilometer,neutron,cinder..)的对外发布入口都是以微服务组件的形式发布,提供统一的rest api,keystone负责统一api的管理及认证.这种微服务的形式,是可进行分布式或弹性部署的前提.
       +----------------------------------+-----------+--------------+--------------+---------+-----------+------------------------+
       | ID                               | Region    | Service Name | Service Type | Enabled | Interface | URL                    |
       +----------------------------------+-----------+--------------+--------------+---------+-----------+------------------------+
       | 07f8a36af7194a9894a212d4729f383f | RegionOne | keystone     | identity     | True    | internal  | http://ubuntu:5000/v3/ |
       | 93a8b806bc984b78addcc05ec6c2e014 | RegionOne | keystone     | identity     | True    | admin     | http://ubuntu:5000/v3/ |
       | b18dd1dc9b0148ca97a1136bfc8f922e | RegionOne | keystone     | identity     | True    | public    | http://ubuntu:5000/v3/ |
       +----------------------------------+-----------+--------------+--------------+---------+-----------+------------------------+
>><<>><<>><<>><<>><<>><<>><<>><<>><<>><<>><<>><>><><><><><><<<>><<>><<><><><><><><><>><>><><>>>><><>>><><><>><<<<<<<<>>>>>><<<><><><><>>

root@ubuntu:/home/ubuntu# apt-get install openstack-dashboard
root@ubuntu:/usr/lib/python2.7/dist-packages/openstack_dashboard/local# vi local_settings.py
>>>>>>>> set OPENSTACK_HOST = "ubuntu" >>>> ALLOWED_HOSTS = ['*'] >>>
>>CACHES = {
   'default': {
       'BACKEND': 'django.core.cache.backends.memcached.MemcachedCache',
       'LOCATION': 'ubuntu:11211',
   },
} >>>>
>>OPENSTACK_KEYSTONE_URL = "http://%s:5000/v3" % OPENSTACK_HOST>>
>>OPENSTACK_API_VERSIONS = {
   "identity": 3,
}
>>

>> OPENSTACK_KEYSTONE_DEFAULT_DOMAIN = "Default">>
>> TIME_ZONE = "UTC" >>

注意查看 /etc/apache2/conf-available/openstack-dashboard.conf 中的配置.这是apache link django 的配置. horizon是django的一个应用.
如果涉及apache的配置文件有修改,记得执行 service apache2 reload 并重启apache2

到这里,我们已经搭建了一个web框架,我们可以通过访问. http://ip/horizon 进行访问.
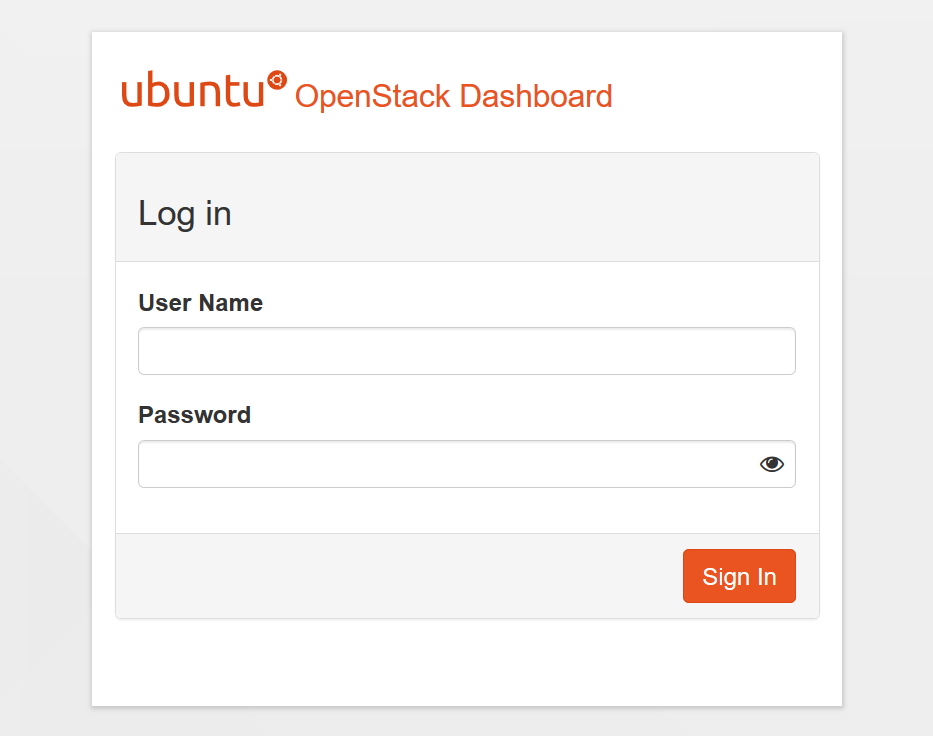
我们使用命令行创建的默认用户登录. admin pas**rd登录.
可以修改主题.
我们查看一下用户情况.
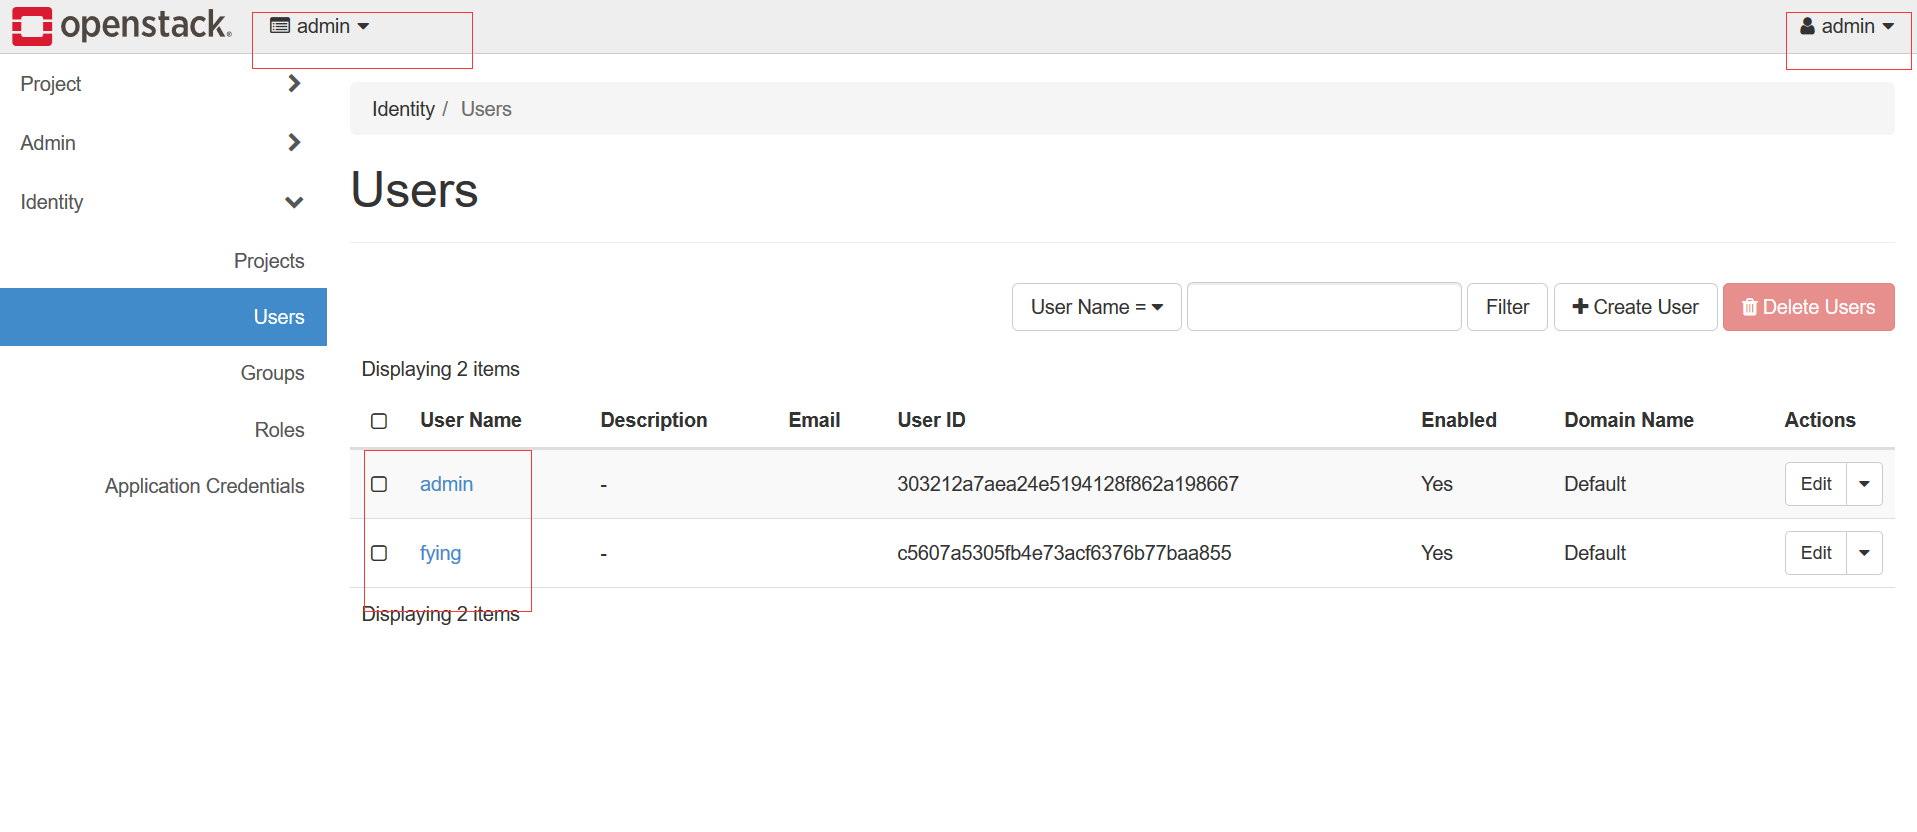
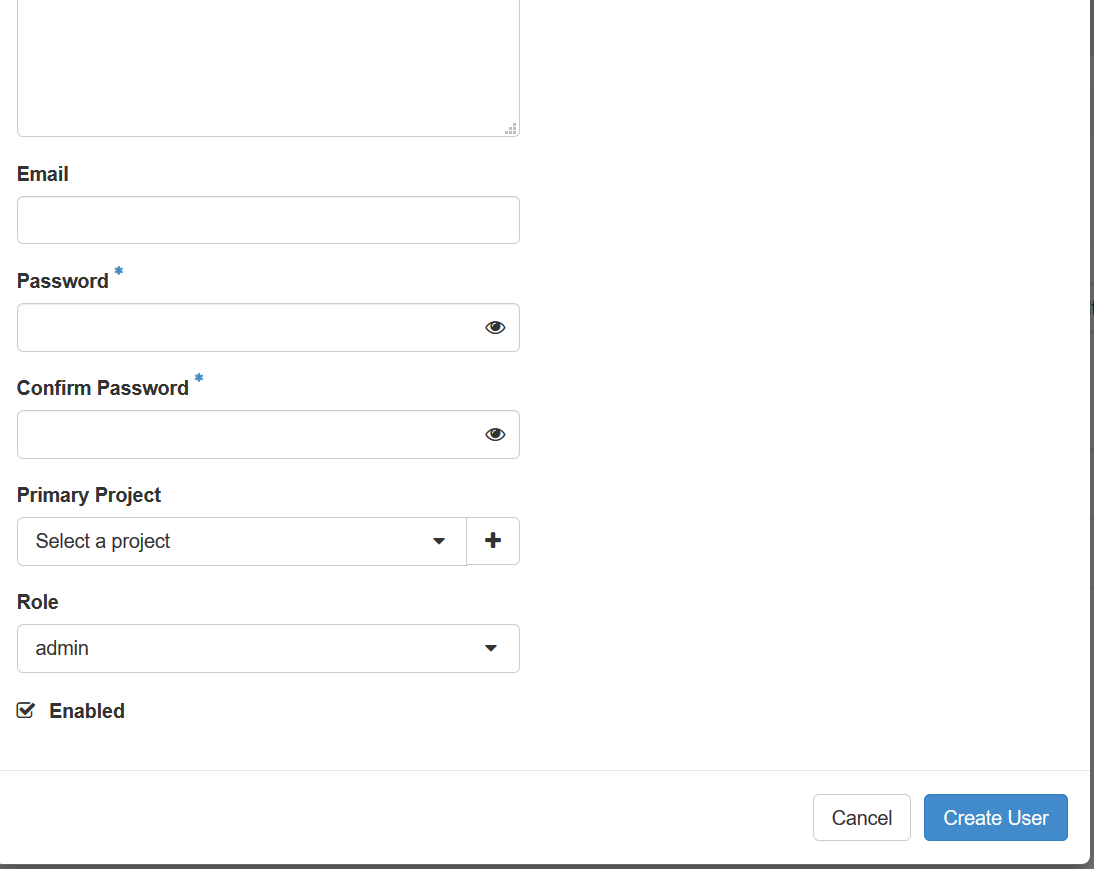
查看下admin进行用户创建,能做什么操作.
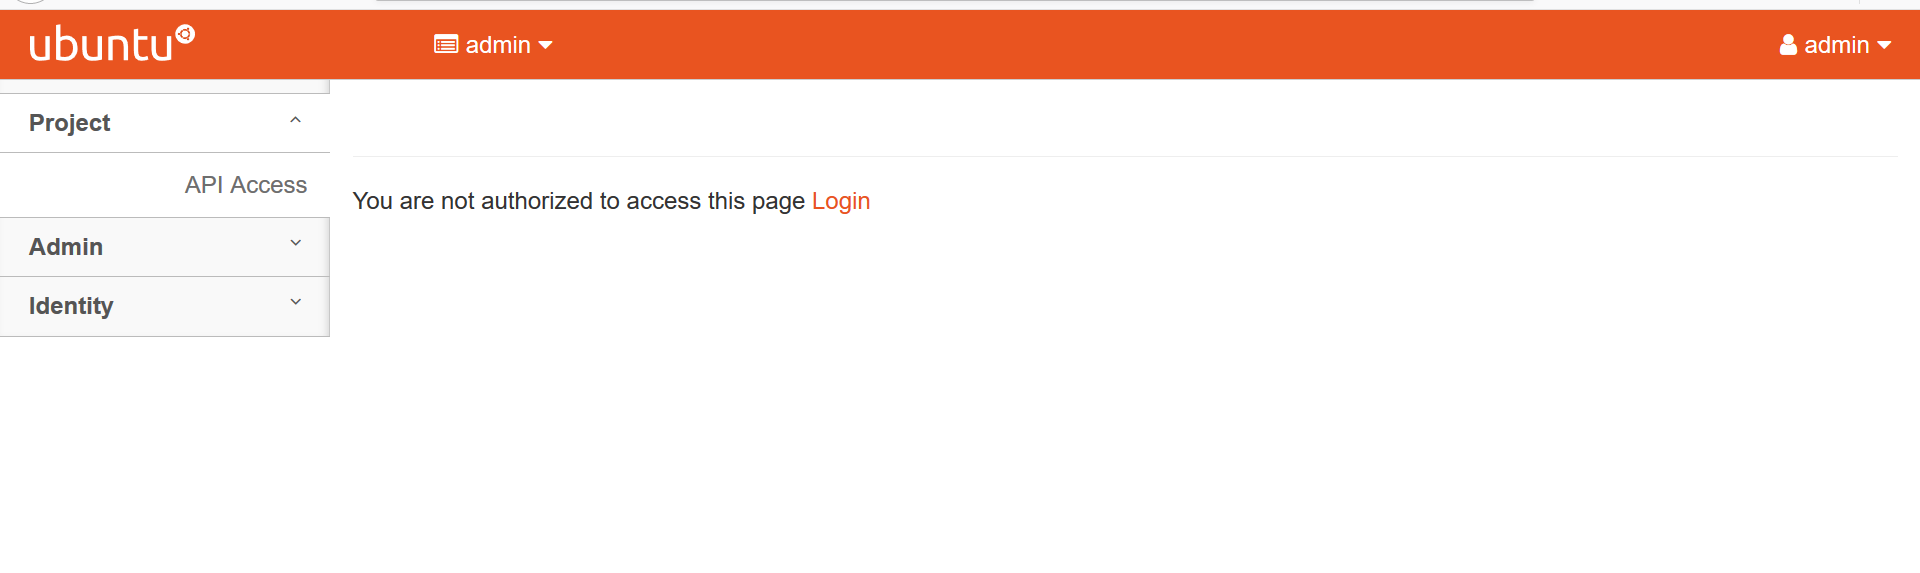
我们再以fying 登录查看下看.
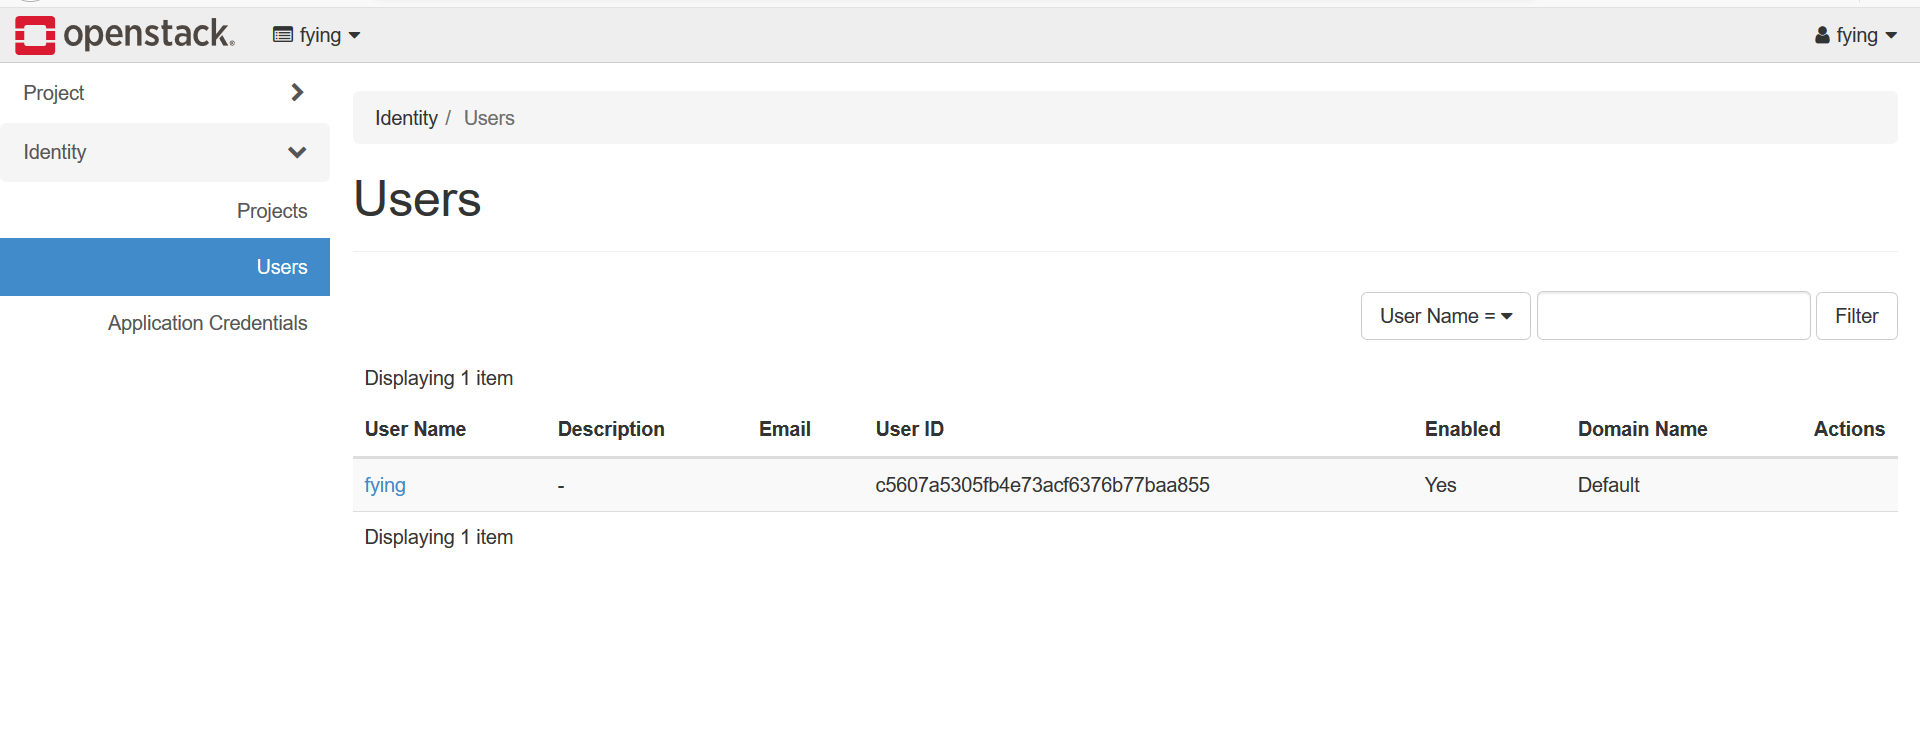
我们发现以fying登录,点击用户,发现只能看到自己的信息,并且不能进行用户创建的权限.↑
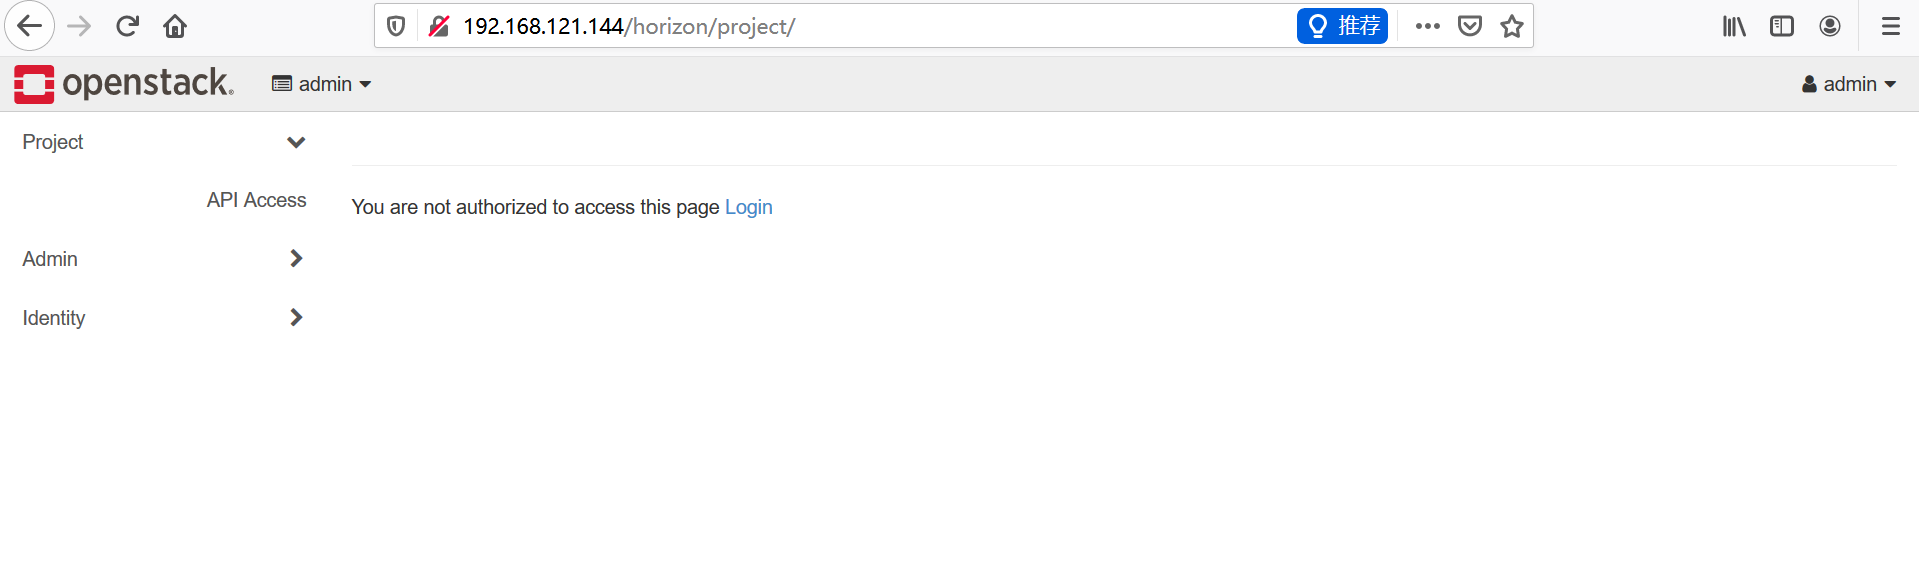
点击登录租户查看.
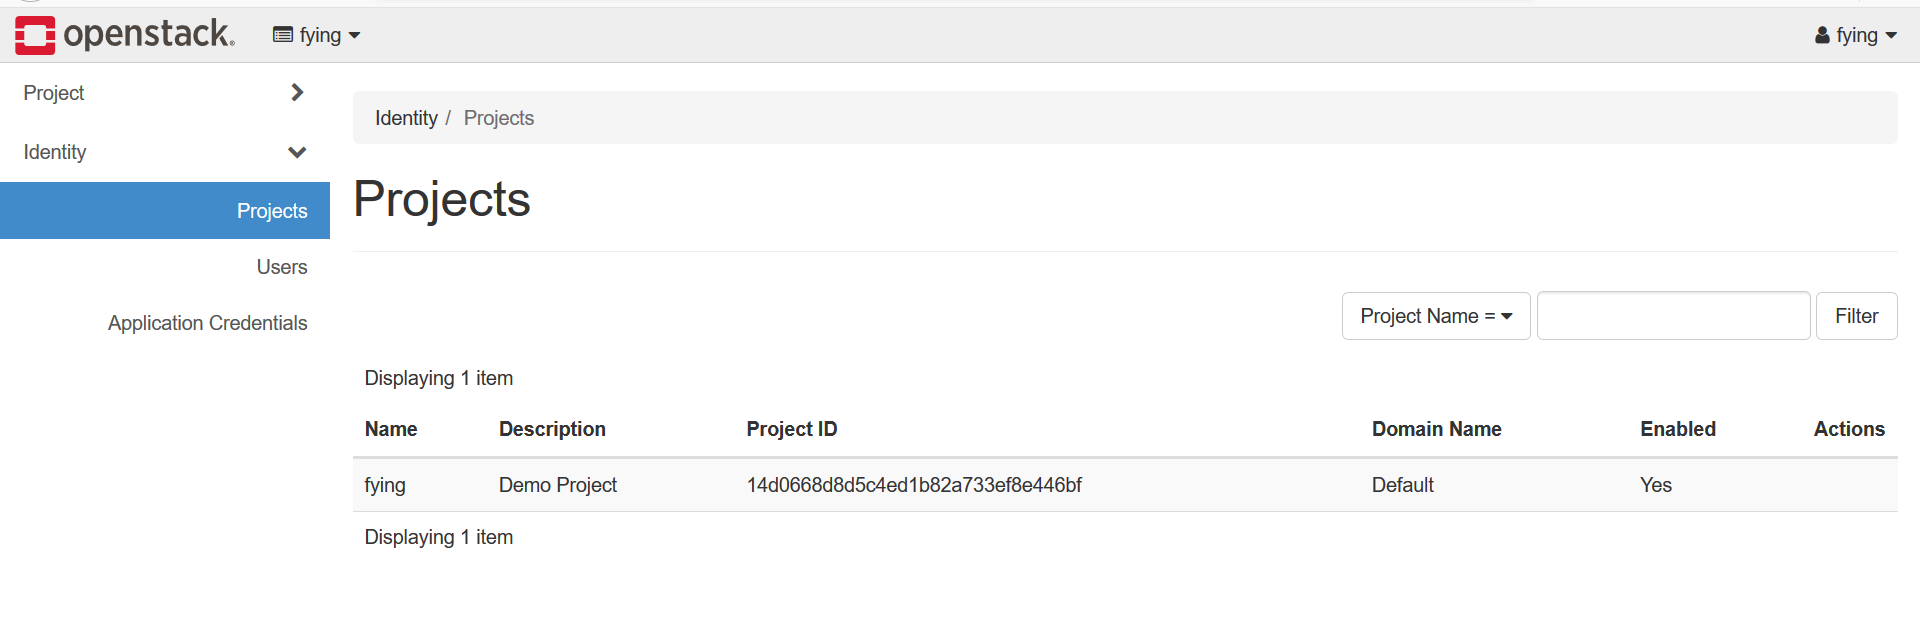
我们发现也不能进行创建操作.因为fying只是一个普通用户. 连创建按钮查看的权力都没有. 事实上,程序并不会为某个用户创建独立的dashboard,但是却可 可以依据用户的角色,选择界面上哪些元素显示或者不显示. 这个是horizon的特色之一.也是代码设计者的巧妙之处.
停下来思考-1
All right.
随着openstack社区的更新,组件的安全已经变得越来越简单,并进行了很大的优化. 想起14年进行安装时,
官方的文档还不全,按照官网操作基本一步一坑.
往往,人在踩坑的时候才会去思考.

到目前为止,我们很顺利的搭建了:
基于django的web应用框架.
带认证的应用框架.
使用keystone作为认证后端的框架.
基于rest的认证组件.
采用了多租户模型,多微服务应用管理,多角色管理的认证组件.
采用了严格api管控的认证组件.
采用模块化编程的前端框架.
基于restAPI进行交互的框架.
可分布式部署的框架.
可基于可控制dashboard-->pannel-->tab-->table-->button-->form灵活显示的前端框架.
...
我们仅仅搭建了horizon+keystone,却应该先停下来思考几个问题. 在相对简单的情况下想清楚一些问题,
有助于在面临复杂问题的时候从容面对.

    有了0-1的基础,思考1+1. 1+2也不会太难. horizon是整个openstack项目面向用户的门户,构建了一个多租户模型应用,
本身并不提供任何功能,所有的功能由 keystone、nova、neutron、cinder、glance、ceilometer等提供,从
这个角度而言,keytone的地位与其余的项目一致,都作为horizon的能力供应服务. 但也有一些不同,keystone
不仅提供了hirizon的认证,也提供了 nova、neutron等其余组件对外暴漏API接口的权限认证,从这个角度讲,
keystone提供了多个服务的统一认证框架,至于其余的组件,如何使用该认证,涉及的内容非常多,其中最主要
的是paste框架,采用该框架,可以非常灵活的在其余组件的api供应组件中(ceimmeter-api、neutron-server、n
ova-api等)方便的加载keystone.

horizon是openstack中,从技术维度讲,是较为简单的一个,但确实业务逻辑构建最复杂的一个,需要有horizon
完成基于nova,keystone,glance等组件的业
务流程,面向用户,提供云计算服务,所以对产品设计的人而言,非常值得借鉴.


不应该因为顺利停止思考:大概有这几个点需要进行深入的思考.
1、django如何部署在apache下?
2、我们刚才使用不同的用户为何看到的内容不一致?
3、我们刚才登录的两个用户角色范围是什么?他们如何定义?
4、openstack原生提供了什么样子的权限模型?
5、openstack原生提供的多租户模型全貌是什么?
6、刚才的一次登录发生了什么?
7、后台敲几个命令行,为何能够创建用户?
8、django如何采用keystone进行权限认证?
9、django如何连接数据库?
10、为何hirizon设置了dashboard-->pannel-->tab-->table-->form-->button等模板元素?
11、如何通过权限控制上述界面元素的显示?
12、一个用户可不可以拥有多个角色?
13、当一个用户拥有多个角色的时候,元素显示是或允许还是并允许?
14、一个用户可不可以在多个租户中?
15、admin 租户,service租户,tenant租户之间什么关系?
16、为何其余的组件没有安装,前端界面没有报错?并仅仅显示了已经安装的keystone相关功能?
17、创建用户发生了什么?
18、如何查看日志?
19、如何使用中文显示?
20、如何汉化?
21、horizon如何与keystone 交互.
22、keystone提供了token机制流程是怎么工作的?
23、keytone提供了多少种token认证机制?如何配置,如何选择?
24、keystone 如何实现多微服务管理?
25、keystone 如何通过policy实现对api的细粒度管理?
26、我想重构界面怎么做?
27、我想重构权限逻辑如何做?
28、我想重构租户模型怎么做?
29、为何有了password 还要有token认证的出现?
30、and so on.
31、再加上ceilometer呢?
>>>>>>>理解>>>>重构>>>>>>增值>>>>>服务>>>>>>
>>>>>Get what?>>>>> if..>>>>>>>>>>>>>>>>>>>>
开始之前
为了调试方便,我们写一个简单的log helper帮助我们进行代码参数内容的理解.
root@ubuntu:/home/ubuntu# touch debuglog.py
root@ubuntu:/home/ubuntu# vi debuglog.py

"""log module for debug purpose"""
import logging
import logging.handlers

"""log class"""
class Log(object):
   logger = None

   @staticmethod
   def init():
       file_path = '/var/log/fy.log'

       Log.logger = logging.getLogger('novadebug')

       if True:
           Log.logger.setLevel(logging.DEBUG)
       else:
           Log.logger.setLevel(logging.INFO)

       formatter = logging.Formatter('%(asctime)s(%(levelname)s)%(name)s : %(message)s')
       file_handler = logging.FileHandler(file_path)
       file_handler.setFormatter(formatter)
       Log.logger.addHandler(file_handler)

   @staticmethod
   def critical(msg):
       if Log.logger is None:
           Log.init()
       Log.logger.critical(msg)

   @staticmethod
   def error(msg):
       if Log.logger is None:
           Log.init()
       Log.logger.error(msg)

   @staticmethod
   def warning(msg):
       if Log.logger is None:
           Log.init()
       Log.logger.warning(msg)

   @staticmethod
   def info(msg):
       if Log.logger is None:
           Log.init()
       Log.logger.info(msg)

   @staticmethod
   def debug(msg):
       if Log.logger is None:
           Log.init()
       Log.logger.debug(msg)

   @staticmethod
   def notset(msg):
       if Log.logger is None:
           Log.init()
       Log.logger.notset(msg)
掌握日志相关的知识非常有必要,主要目的是可以将数据从程序流转化为日志流,进一步通过标准syslog协议(syslog-ng rsyslog ulog)可对接外部日志分析系统.
那么,如何使用上述debuglog文件?
首先将debuglog.py加入到系统默认的python代码路径中(系统默认的python路径 /usr/lib/python2.7/dist-packages/&&/usr/local/lib/python2.7/dist-packages/&&.).
>>> import sys
>>> sys.path
['', '/usr/local/lib/python2.7/dist-packages/Sphinx-1.5-py2.7.egg',
     '/usr/local/lib/python2.7/dist-packages/requests-2.21.0-py2.7.egg',
     '/usr/local/lib/python2.7/dist-packages/imagesize-1.1.0-py2.7.egg',
     '/usr/local/lib/python2.7/dist-packages/alabaster-0.7.12-py2.7.egg',
     '/usr/local/lib/python2.7/dist-packages/Babel-2.6.0-py2.7.egg',
     '/usr/local/lib/python2.7/dist-packages/snowballstemmer-1.2.1-py2.7.egg',
     '/usr/local/lib/python2.7/dist-packages/docutils-0.14-py2.7.egg',
     '/usr/local/lib/python2.7/dist-packages/Pygments-2.3.1-py2.7.egg',
     '/usr/local/lib/python2.7/dist-packages/Jinja2-2.10-py2.7.egg',
     '/usr/local/lib/python2.7/dist-packages/six-1.12.0-py2.7.egg',
     '/usr/local/lib/python2.7/dist-packages/certifi-2018.11.29-py2.7.egg',
     '/usr/local/lib/python2.7/dist-packages/urllib3-1.24.1-py2.7.egg',
     '/usr/local/lib/python2.7/dist-packages/idna-2.8-py2.7.egg',
     '/usr/local/lib/python2.7/dist-packages/chardet-3.0.4-py2.7.egg',
     '/usr/local/lib/python2.7/dist-packages/pytz-2018.9-py2.7.egg',
     '/usr/local/lib/python2.7/dist-packages/MarkupSafe-1.1.0-py2.7.egg',
     '/usr/lib/python2.7', '/usr/lib/python2.7/plat-x86_64-linux-gnu',
     '/usr/lib/python2.7/lib-tk', '/usr/lib/python2.7/lib-old',
     '/usr/lib/python2.7/lib-dynload', '/usr/local/lib/python2.7/dist-packages',
     '/usr/lib/python2.7/dist-packages']
>>>>>>>>>>>>>>>>>>>>.how to use debuglog >>>>>>>>>>>>>>>>>>>>.
root@ubuntu:/home/ubuntu# mv debuglog.py  /usr/lib/python2.7/dist-packages/
root@ubuntu:/home/ubuntu# touch /var/log/fy.log
root@ubuntu:/home/ubuntu# chmod 777 /var/log/fy.log
root@ubuntu:/home/ubuntu# python
Python 2.7.17 (default, Nov  7 2019, 10:07:09)
[GCC 7.4.0] on linux2
Type "help", "copyright", "credits" or "license" for more information.
>>> from debuglog import Log #系统识别到代码.
我们以查看登录的request 信息为例.(http://your_ip/horizon/auth/login/), 查阅代码我们发现处理该url的view路径为:
root@ubuntu:/usr/lib/python2.7/dist-packages/openstack_auth# vi views.py
我们修改view.py如下:
头部增加:
from debuglog import Log

view 函数中我们想查看request 参数信息.

def login(request, template_name=None, extra_context=None, \**kwargs):
   """Logs a user in using the :class:`~openstack_auth.forms.Login` form."""
   Log.info('now this is first login request info=%s' % dir(request)) # add anywhere you want.

重启apache

root@ubuntu:/usr/lib/python2.7/dist-packages/openstack_auth# /etc/init.d/apache2 restart
[ ok ] Restarting apache2 (via systemctl): apache2.service.
浏览器访问: http://your_ip/horizon/auth/login/
查看日志文件:
root@ubuntu:/usr/lib/python2.7/dist-packages/openstack_auth# vi /var/log/fy.log
 2020-01-26 09:40:37,605(INFO)novadebug : now this is first login request info=[
 'COOKIES', 'FILES', 'GET', 'LANGUAGE_CODE', 'META', 'POST', '__class__', '__delattr__',
 '__dict__', '__doc__', '__format__', '__getattribute__', '__hash__', '__init__',
 '__iter__', '__module__', '__new__', '__reduce__', '__reduce_ex__', '__repr__',
 '__setattr__', '__sizeof__', '__str__', '__subclasshook__', '__weakref__',
 '_cached_user', '_encoding', '_get_post', '_get_raw_host', '_get_scheme',
 '_initialize_handlers', '_load_post_and_files', '_mark_post_parse_error', '_messages',
 '_post_parse_error', '_read_started', '_set_post', '_stream', '_upload_handlers',
 'body', 'build_absolute_uri', 'close', 'content_params', 'content_type', 'csrf_processing_done',
 'encoding', 'environ', 'get_full_path', 'get_host', 'get_port', 'get_raw_uri',
 'get_signed_cookie', 'horizon', 'is_ajax', 'is_secure', 'method', 'parse_file_upload',
 'path', 'path_info', 'read', 'readline', 'readlines', 'resolver_match', 'scheme',
 'sensitive_post_parameters', 'session', 'upload_handlers', 'user', 'xreadlines']

       1  HttpRequest.scheme       请求的协议,一般为http或者https,字符串格式(以下属性中若无特殊指明,均为字符串格式)

       2  HttpRequest.body        http请求的主体,二进制格式.

       3  HttpRequest.path             所请求页面的完整路径(但不包括协议以及域名),也就是相对于网站根目录的路径.

       4  HttpRequest.path_info     获取具有 URL 扩展名的资源的附加路径信息.相对于HttpRequest.path,使用该方法便于移植.

       5  HttpRequest.method               获取该请求的方法,比如: GET   POST .........

       6  HttpRequest.encoding             获取请求中表单提交数据的编码.

       7  HttpRequest.content_type      获取请求的MIME类型(从CONTENT_TYPE头部中获取),django1.10的新特性.

       8  HttpRequest.content_params  获取CONTENT_TYPE中的键值对参数,并以字典的方式表示,django1.10的新特性.

       9  HttpRequest.GET                    返回一个 querydict 对象(类似于字典),该对象包含了所有的HTTP GET参数

       10  HttpRequest.POST                返回一个 querydict ,该对象包含了所有的HTTP POST参数,
                                           通过表单上传的所有字符都会保存在该属性中.

       11  HttpRequest.COOKIES        返回一个包含了所有cookies的字典.

       12  HttpRequest.FILES           返回一个包含了所有的上传文件的  querydict  对象.通过表单所上传的所有文件都会保存在该属性中.

                                                      key的值是input标签中name属性的值,value的值是一个UploadedFile对象

       13  HttpRequest.META                返回一个包含了所有http头部信息的字典

       14  HttpRequest.session       中间件属性

       15  HttpRequest.site        中间件属性

       16  HttpRequest.user       中间件属性,表示当前登录的用户.HttpRequest.user实际上是由一个定义在
                                    django.contrib.auth.models中的user model类所创建的对象.此模型也可以自己定义.

        16.2  属性
        is_authenticated   布尔值,标志着用户是否已认证.在django1.10之前,没有该属性,但有与该属性同名的方法.

        16.3  方法


        2020-01-26 09:48:38,047(INFO)novadebug : now this is first login request.user=
        ['__class__', '__delattr__', '__dict__', '__doc__', '__eq__', '__format__',
         '__getattribute__', '__hash__', '__init__', '__module__', '__ne__', '__new__',
         '__reduce__', '__reduce_ex__', '__repr__', '__setattr__', '__sizeof__', '__str__',
         '__subclasshook__', '__unicode__', '__weakref__', '_groups', '_user_permissions',
         'check_password', 'delete', 'get_all_permissions', 'get_group_permissions',
         'get_username', 'groups', 'has_module_perms', 'has_perm', 'has_perms', 'id',
         'is_active', 'is_anonymous', 'is_authenticated', 'is_staff', 'is_superuser',
         'pk', 'save', 'set_password', 'user_permissions', 'username']


        这样我们便可以看到request 中的信息.其中对我们最重要的为 session, COOKIES, user等信息.尤其是user.
        正常的request中并不会有user熟悉,思考一下user是在哪里封装到reqeust中的.
        做一个简单的测试:
        我们将setting.py-middleware中与session的中间件注释掉,重启apache2,再次查看下request.
        2020-01-26 11:52:33,079(INFO)novadebug : now this is first login request
        info=['COOKIES', 'FILES', 'GET', 'LANGUAGE_CODE', 'META', 'POST', '__class__',
        '__delattr__', '__dict__', '__doc__', '__format__', '__getattribute__', '__hash__',
        '__init__', '__iter__', '__module__', '__new__', '__reduce__', '__reduce_ex__',
        '__repr__', '__setattr__', '__sizeof__', '__str__', '__subclasshook__', '__weakref__',
        '_encoding', '_get_post', '_get_raw_host', '_get_scheme', '_initialize_handlers',
        '_load_post_and_files', '_mark_post_parse_error', '_post_parse_error', '_read_started',
        '_set_post', '_stream', '_upload_handlers', 'body', 'build_absolute_uri', 'close',
        'content_params', 'content_type', 'csrf_processing_done', 'encoding', 'environ',
        'get_full_path', 'get_host', 'get_port', 'get_raw_uri', 'get_signed_cookie', 'horizon',
        'is_ajax', 'is_secure', 'method', 'parse_file_upload', 'path', 'path_info', 'read',
        'readline', 'readlines', 'resolver_match', 'scheme', 'sensitive_post_parameters',
        'upload_handlers', 'xreadlines']
        >>>>>>>>>>>>>>>>>>>>>>>>>>>>>>>>>>>>>>>>>>>>>>>>>>>>>
        发现user属性不在了. 可知,Django 使用 sessions 和中间件将身份验证系统挂接到请求对象中.
        它们在每次请求中都会提供 request.user 属性.如果当前没有用户登录,这个属性将会被设置为 AnonymousUser,
        否则将会被设置为 User 实例.可以使用 is_authenticated 区分两者.
        具体的是通过:
            'django.contrib.auth.middleware.AuthenticationMiddleware',
        中间件加载的.赋值代码为:
        class AuthenticationMiddleware(MiddlewareMixin):
           def process_request(self, request):
               assert hasattr(request, 'session'), (
                   "The Django authentication middleware requires session middleware "
                   "to be installed. Edit your MIDDLEWARE%s setting to insert "
                   "'django.contrib.sessions.middleware.SessionMiddleware' before "
                   "'django.contrib.auth.middleware.AuthenticationMiddleware'."
               ) % ("_CLASSES" if settings.MIDDLEWARE is None else "")
               request.user = SimpleLazyObject(lambda: get_user(request))# !!重点,在这里创建request 的user属性. user 初始化模型已经加载.
        >>>>>>>>>>>>>>>>>>>>>>>>>>>>>>>>>>>>>>>>>>>>>>>>>>>>>>>>>>>>>>>>>>>>>>>..
        那么如何加载用户模型?我们看到的request.user已经被赋值,但并没有加载keystone 的user模型.
Note
突发疫情.我们知道他们在说谎,他们自己也知道自己说谎,他们也知道我们知道他们在说谎,我们也知道他们知道我们知道他们说谎,他们知道我们也知道他们知道我们知道他们说谎,但是他们依然在说谎. # 真相难寻.
看下代码如何看到加载keystone user 模型的真相.
- 我们登录后查看用户属性.那么如何加载用户模型?我们看到的request.user已经被赋值,但并没有加载keystone user模型.
- 我们登录后查看用户属性.
代码位置:
openstack_auth\views.py
      def login(request, template_name=None, extra_context=None, \**kwargs):
              """Logs a user in using the :class:`~openstack_auth.forms.Login` form."""
              Log.info('now this is first login request info=%s' % dir(request))
              Log.info('now this is first login request.user=%s' % dir(request.user))
              #2020-04-07 10:07:52,187(INFO)novadebug : request is ajax and the info is :['__class__', '__delattr__', '__dict__', #'__doc__', '__eq__', '__format__', '__getattribute__', '__hash__', '__init__', '__module__', '__ne__', '__new__', #'__reduce__', '__reduce_ex__', '__repr__', '__setattr__', '__sizeof__', '__str__', '__subclasshook__', '__unicode__', #'__weakref__', '_groups', '_user_permissions', 'check_password', 'delete', 'get_all_permissions', #'get_group_permissions', 'get_username', 'groups', 'has_module_perms', 'has_perm', 'has_perms', 'id', 'is_active', #'is_anonymous', 'is_authenticated', 'is_staff', 'is_superuser', 'pk', 'save', 'set_password', 'user_permissions', #'username']

              Log.info('now this is first login request.ajax=%s' % request.is_ajax)
              # If the user enabled websso and selects default protocol
              # from the dropdown, We need to redirect user to the websso url
              if request.method == 'POST':
                      auth_type = request.POST.get('auth_type', 'credentials')
                      if utils.is_websso_enabled() and auth_type != 'credentials':
                              auth_url = getattr(settings, 'WEBSSO_KEYSTONE_URL',
                                                                 request.POST.get('region'))
                              url = utils.get_websso_url(request, auth_url, auth_type)
                              Log.info('now the url point to:%s' % url)
                              return shortcuts.redirect(url)

              if not request.is_ajax():
                      # If the user is already authenticated, redirect them to the
                      # dashboard straight away, unless the 'next' parameter is set as it
                      # usually indicates requesting access to a page that requires different
                      # permissions.
                      Log.info('request is ajax and the info is :%s' % dir(request.user))
                      if (request.user.is_authenticated and
                                      auth.REDIRECT_FIELD_NAME not in request.GET and
                                      auth.REDIRECT_FIELD_NAME not in request.POST):
                              return shortcuts.redirect(settings.LOGIN_REDIRECT_URL)

              # Get our initial region for the form.
              initial = {}
              current_region = request.session.get('region_endpoint', None)
              requested_region = request.GET.get('region', None)
              regions = dict(getattr(settings, "AVAILABLE_REGIONS", []))
              if requested_region in regions and requested_region != current_region:
                      initial.update({'region': requested_region})

              if request.method == "POST":
                      form = functional.curry(forms.Login)
              else:
                      form = functional.curry(forms.Login, initial=initial)

              if extra_context is None:
                      extra_context = {'redirect_field_name': auth.REDIRECT_FIELD_NAME}

              extra_context['csrf_failure'] = request.GET.get('csrf_failure')

              choices = getattr(settings, 'WEBSSO_CHOICES', ())
              extra_context['show_sso_opts'] = (utils.is_websso_enabled() and
                                                                                len(choices) > 1)

              if not template_name:
                      if request.is_ajax():
                              template_name = 'auth/_login.html'
                              extra_context['hide'] = True
                      else:
                              template_name = 'auth/login.html'

              Log.info('before res request is  :%s' % dir(request.user))# !!重点
              #2020-04-07 10:07:43,934(INFO)novadebug : before res request is  :['__class__', '__delattr__', '__dict__', '__doc__', '__eq__', '__format__', '__getattribute__', '__hash__', '__init__', '__module__', '__ne__', '__new__', '__reduce__', '__reduce_ex__', '__repr__', '__setattr__', '__sizeof__', '__str__', '__subclasshook__', '__unicode__', '__weakref__', '_groups', '_user_permissions', 'check_password', 'delete', 'get_all_permissions', 'get_group_permissions', 'get_username', 'groups', 'has_module_perms', 'has_perm', 'has_perms', 'id', 'is_active', 'is_anonymous', 'is_authenticated', 'is_staff', 'is_superuser', 'pk', 'save', 'set_password', 'user_permissions', 'username']
              res = django_auth_views.login(request,
                                                                        template_name=template_name,
                                                                        authentication_form=form,
                                                                        extra_context=extra_context,
                                                                        \**kwargs)
              # Save the region in the cookie, this is used as the default
              # selected region next time the Login form loads.

              Log.info('after res request is  :%s' % dir(request.user))#!!重点 keystone 用户模型已经加载.
              # 2020-04-07 10:07:55,809(INFO)novadebug : after res request is  :['DoesNotExist', 'Meta', 'MultipleObjectsReturned', 'REQUIRED_FIELDS', 'USERNAME_FIELD', '__class__', '__delattr__', '__dict__', '__doc__', '__eq__', '__format__', '__getattribute__', '__hash__', '__init__', u'__module__', '__ne__', '__new__', '__reduce__', '__reduce_ex__', '__repr__', '__setattr__', '__setstate__', '__sizeof__', '__str__', '__subclasshook__', '__unicode__', '__weakref__', '_authorized_tenants', '_check_column_name_clashes', '_check_field_name_clashes', '_check_fields', '_check_id_field', '_check_index_together', '_check_local_fields', '_check_long_column_names', '_check_m2m_through_same_relationship', '_check_managers', '_check_model', '_check_model_name_db_lookup_clashes', '_check_ordering', '_check_swappable', '_check_unique_together', '_do_insert', '_do_update', '_get_FIELD_display', '_get_next_or_previous_by_FIELD', '_get_next_or_previous_in_order', '_get_pk_val', '_get_unique_checks', '_groups', '_meta', '_perform_date_checks', '_perform_unique_checks', '_save_parents', '_save_table', '_services_region', '_set_pk_val', '_user_permissions', 'authorized_tenants', 'available_services_regions', 'backend', 'check', 'check_password', 'clean', 'clean_fields', 'date_error_message', 'delete', 'domain_id', 'domain_name', 'enabled', 'endpoint', 'from_db', 'full_clean', 'get_all_permissions', 'get_deferred_fields', 'get_email_field_name', 'get_full_name', 'get_group_permissions', 'get_session_auth_hash', 'get_short_name', 'get_username', 'groups', 'has_a_matching_perm', 'has_module_perms', 'has_perm', 'has_perms', 'has_usable_password', 'id', 'is_active', 'is_anonymous', 'is_authenticated', 'is_federated', 'is_staff', 'is_superuser', 'is_token_expired', 'keystone_user_id', 'last_login', 'natural_key', 'normalize_username', 'objects', 'password', 'password_expires_at', 'pk', 'prepare_database_save', 'project_id', 'project_name', 'refresh_from_db', 'roles', 'save', 'save_base', 'serializable_value', 'service_catalog', 'services_region', 'set_password', 'set_unusable_password', 'tenant_id', 'tenant_name', 'time_until_expiration', 'token', 'unique_error_message', 'unscoped_token', 'user_domain_id', 'user_domain_name', 'user_permissions', 'username', 'validate_unique']

              if request.method == "POST":
                      utils.set_response_cookie(res, 'login_region',
                                                                        request.POST.get('region', ''))
                      utils.set_response_cookie(res, 'login_domain',
                                                                        request.POST.get('domain', ''))

              # Set the session data here because django's session key rotation
              # will erase it if we set it earlier.
              Log.info('request user is  :%s' % dir(request.user))
>>>>>>>>>>>>>>>>>>>>>>>>>>>>>>>>>>>>>>>>>>>>>>>>>>>>>>>>>>>>>>>>>>>>>..
把重点定位到openstack_authviews.py 下的def login 下的django_auth_views.login,函数. 是用户加载的关键.其中重要的初始化参数为: authentication_form=form,也就是前台表单用户输入的内容. 看一下函数调用表,把调用流程熟悉,即可知道django如何加载keystone 用户模型,如何加载keystone认证backend,如何实现一次用户登录的认证. 这个过程非常复杂,包含的逻辑判断非常多,非常值得深入代码阅读,去了解一次认证流程. 前部分主要了解django如何进行认证,如何加载keystone认证backend,如何加载keystone user模型. 后半部分可以非常详细的了解到keystone的认证流程.
上述的代码流反映了一次登录的情况,也是一个系统的核心框架,即一次api调用流程,一次带认证的API调用流程.构成了一个认证系统的核心.每一步都值得思考,逻辑判断的点非常多,更细化的流程可归结为:

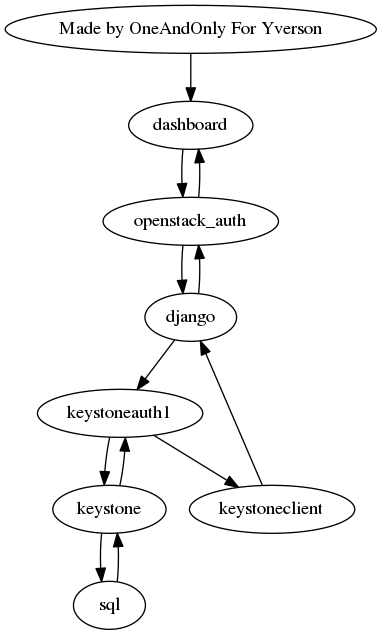
一个图片的制作,是比较消耗时间的一个工作,把图片制作代码也贴在此,供参考,图片流程为引导性指南,混杂了调用关系和处理流程:
digraph openstack_login{
        node [shape=Mrecord fontname="Inconsolata, Consolas", fontsize=12, penwidth=0.5]
        "MADE BY OneAndOnly version FY" -> "django_auth_views.login(openstack_auth\\views.py)"[label="开始认证代码流程"];
        "django_auth_views.login(openstack_auth\\views.py)" ->
        "login(django\\contrib\\auth\\views.py)"[label="调用django认证流程"];
        "login(django\\contrib\\auth\\views.py)" ->
        "LoginView.as_view(django\\contrib\\auth\\views.py)"[label="调用django认证流程"];
        "LoginView.as_view(django\\contrib\\auth\\views.py)" ->
        "SuccessURLAllowedHostsMixin(django\\contrib\\auth\\views.py)"[label="父类"];
        "LoginView.as_view(django\\contrib\\auth\\views.py)" ->
        "FormView(django\\views\\generic\\edit.py)"[label="LoginView的关键父类"];
        "FormView(django\\views\\generic\\edit.py)" ->
        "TemplateResponseMixin(django\\views\\generic\\base.py)"[label="FormView的父类"];
        "FormView(django\\views\\generic\\edit.py)" ->
        "BaseFormView(django\\views\\generic\\edit.py)"[label="FormView的父类"];
        "BaseFormView(django\\views\\generic\\edit.py)" ->
        "FormMixin(django\\views\\generic\\edit.py)"[label="BaseFormView的父类"];
        "BaseFormView(django\\views\\generic\\edit.py)" ->
        "ProcessFormView(django\\views\\generic\\edit.py)"[label="BaseFormView的父类"];
        "ProcessFormView(django\\views\\generic\\edit.py)" -> "ProcessFormView.post"[label="由dispatch转到post请求,关键函数"];
        "ProcessFormView.post" -> "form.is_valid()"[label="关键认证节点"];
        "form.is_valid()" -> "AuthenticationForm(\\django\\contrib\\auth\\forms.py)"[label="form是参数传入,即authentication_form=AuthenticationForm"];
        "AuthenticationForm(\\django\\contrib\\auth\\forms.py)" -> "Form(\\django\\forms\\forms.py)"[label="AuthenticationForm的父类"];
        "Form(\\django\\forms\\forms.py)" ->
                "BaseForm def is_valid(\\django\\forms\\forms.py)"[label="Form的父类BaseForm中找到了is_valid函数的具体实现"];
        "BaseForm def is_valid(\\django\\forms\\forms.py)" ->
                "self.errors(\\django\\forms\\forms.py)"[label="关注最关键的return函数self.errors"];
        "self.errors(\\django\\forms\\forms.py)" -> "self.full_clean(\\django\\forms\\forms.py)"[label="调用最关键函数self.full_clean"];
        "self.full_clean(\\django\\forms\\forms.py)" -> "self._clean_form(\\django\\forms\\forms.py)"[label="调用最关键函数self._clean_form"];
        "self._clean_form(\\django\\forms\\forms.py)" ->
                "AuthenticationForm.clean(\\django\\contrib\\auth\\forms.py)"[label="调用最关键函数self.clean 由AuthenticationForm具体实现"];
        "AuthenticationForm.clean(\\django\\contrib\\auth\\forms.py)" ->
                "self.user_cache = authenticate(self.request, username=username, password=password)"[label="获取form 用户名密码开始认证流程"];
        "self.user_cache = authenticate(self.request, username=username, password=password)" -> "authenticate(\\django\\contrib\\auth\\__init__.py)";
        "authenticate(\\django\\contrib\\auth\\__init__.py)" ->
                "authenticate_with_backend(backend, backend_path, request, credentials)(\\django\\contrib\\auth\\__init__.py)"[label="非常关键的一步,选取认证backend,是从setting文件中读取,实现认证由django默认认证方式,转为openstack认证openstack_auth.backend.KeystoneBackend"];
                "authenticate_with_backend(backend, backend_path, request, credentials)(\\django\\contrib\\auth\\__init__.py)" ->
                "_authenticate_with_backend(backend, backend_path, request, credentials)(\\django\\contrib\\auth\\__init__.py)";
        "_authenticate_with_backend(backend, backend_path, request, credentials)(\\django\\contrib\\auth\\__init__.py)" -> "backend.authenticate(\*args, \**credentials)"[label="非常关键的一步,使用openstack认证openstack_auth.backend.KeystoneBackend 认证"];
        "backend.authenticate(\*args, \**credentials)" -> "def authenticate(self, auth_url=None, \**kwargs):(\\openstack_auth\\backend.py)"[label="非常关键,正式进入openstack认证流程,从这里开始由openstck_auth转向keystone认证构造过程"];
        "def authenticate(self, auth_url=None, \**kwargs):(\\openstack_auth\\backend.py)" -> "unscoped_auth = plugin.get_plugin(auth_url=auth_url, \**kwargs)";
                "unscoped_auth = plugin.get_plugin(auth_url=auth_url, \**kwargs)" ->  "v3_auth.Password"[label="非常关键,选择keystone API版本,有3或者2,根据setting配置文件选择,后续以3为验证过程,再此完成认证初始化准备"];
                "unscoped_auth = plugin.get_plugin(auth_url=auth_url, \**kwargs)" ->  "v2_auth.Password"[label="非常关键,选择keystone API版本,有3或者2,根据setting配置文件选择,后续以3为验证过程"];
                "v3_auth.Password" ->
                "unscoped_auth_ref = plugin.get_access_info(unscoped_auth)"[label="非常关键,开始keystone认证流程,首先使用username+password换取token,看一下流程如何实现"];
                "unscoped_auth_ref = plugin.get_access_info(unscoped_auth)" ->"session";
                "unscoped_auth_ref = plugin.get_access_info(unscoped_auth)" -> "unscoped_auth_ref = keystone_auth.get_access(session)(\\openstack_auth\\plugin\\base.py)"[label="unscoped_auth_ref指是该用户还未获得tenant信息"];
                "unscoped_auth_ref = keystone_auth.get_access(session)(\\openstack_auth\\plugin\\base.py)" -> "def get_auth_ref(self, session, \**kwargs):(\\keystoneauth1\\identity\\v3\\base.py)"[label="开始调用keystoneauth1,是keystone的认证中间件,get_auth_ref是v3_auth.Password父类来实现的,位置在\\keystoneauth1\\identity\\v3\\base.py"];
                "def get_auth_ref(self, session, \**kwargs):(\\keystoneauth1\\identity\\v3\\base.py)" -> "resp = session.post(token_url, json=body, headers=headers,authenticated=False, log=False, \**rkwargs)(\\keystoneauth1\\identity\\v3\\base.py)"[label="构造restapi,post 动作发出,至此dashboard正式通过keystoneauth1开始第一次认证,企图获取认证token"];
                "resp = session.post(token_url, json=body, headers=headers,authenticated=False, log=False, \**rkwargs)(\\keystoneauth1\\identity\\v3\\base.py)" -> "Routers(wsgi.RoutersBase):( post_action='authenticate_for_token')(\\keystone\\auth\\routers.py)"[label="由keystone开始处理rest请求,用到router wsgi框架处理"];
                "Routers(wsgi.RoutersBase):( post_action='authenticate_for_token')(\\keystone\\auth\\routers.py)" -> "Auth(controller.V3Controller).authenticate_for_token(\\keystone\\auth\\controllers.py)"[label="根据路由,选择处理函数为authenticate_for_token"];
        "Auth(controller.V3Controller).authenticate_for_token(\\keystone\\auth\\controllers.py)" ->  "Auth(controller.V3Controller).authenticate(\\keystone\\auth\\controllers.py)"[label="根据路由,选择处理函数为authenticate_for_token"];
                "Auth(controller.V3Controller).authenticate(\\keystone\\auth\\controllers.py)" ->
                "resp = method.authenticate(request,auth_info.get_method_data(method_name))(\\keystone\\auth\\controllers.py)"[label="选择认证方法,method参数为通过rest请求带来的,为password,也是plugin循环中带过来的,第一次认证为password,后续为token"];
                "resp = method.authenticate(request,auth_info.get_method_data(method_name))(\\keystone\\auth\\controllers.py)" ->
                "Password(base.AuthMethodHandler) authenticate(self, request, auth_payload)(\\keystone\\auth\plugins\\password.py)"[label="选择password 认证方式"];
                "Password(base.AuthMethodHandler) authenticate(self, request, auth_payload)(\\keystone\\auth\plugins\\password.py)" ->
                "user_info = auth_plugins.UserAuthInfo.create(auth_payload, METHOD_NAME)(\\keystone\\auth\plugins\\password.py)"[label="开始使用初始化参数创建用户信息"];
                "user_info = auth_plugins.UserAuthInfo.create(auth_payload, METHOD_NAME)(\\keystone\\auth\plugins\\password.py)" ->
                "BaseUserInfo(provider_api.ProviderAPIMixin, object) create()(\\keystone\\auth\\plugins\\core.py)"[label="选择处理方式,由配置处理,可以为sql,可以为ldap"];
                "BaseUserInfo(provider_api.ProviderAPIMixin, object) create()(\\keystone\\auth\\plugins\\core.py)" ->
                "def _validate_and_normalize_auth_data(self, auth_payload)(\\keystone\\auth\\plugins\\core.py)" [label="非常重要,判断参数是否由user_id or username 选择不同的认证流程,第一次没有id,所以选择name+password方式认证"];
                "def _validate_and_normalize_auth_data(self, auth_payload)(\\keystone\\auth\\plugins\\core.py)" ->
                "user_ref = PROVIDERS.identity_api.get_user_by_name (\\keystone\\auth\\plugins\\core.py)"[label="非常重要,采用username换取user_id"];
                "user_ref = PROVIDERS.identity_api.get_user_by_name (\\keystone\\auth\\plugins\\core.py)" ->
                "def get_user_by_name:(\\keystone\\identity\backends\\sql.py)"[label="非常重要,由keystone 路由处理到sql处理"];
                "def get_user_by_name:(\\keystone\\identity\backends\\sql.py)" ->                  "PROVIDERS.identity_api.authenticate(\\keystone\\auth\\plugins\\password.py)"[label="获取到user_id,继续认证流程,认证初始化参数为user_id+password"];
                "PROVIDERS.identity_api.authenticate(\\keystone\\auth\\plugins\\password.py)" ->
                "def authenticate(self, request, auth_payload)(\\keystone\\auth\plugins\\password.py)"[label="最终认证流程,到数据库中查询判断,其中明文password 采用password_hashing.check_password(password, user_ref.password)函数,转化为hash,以此匹配数据库中的密文password"];
                "def authenticate(self, request, auth_payload)(\\keystone\\auth\plugins\\password.py)"->
                "self.check_auth_expiry(scoped_auth_ref) (\\openstack_auth\\backend.py)"[label="至此,完成第一次rest token 认证,user完成全部信息,开始带token参数访问,不再使用password认证,unscoped开始转化为scoped,开始验证token是否过期"];
                "self.check_auth_expiry(scoped_auth_ref) (\\openstack_auth\\backend.py)" -> "token过期,重新申请";
                "self.check_auth_expiry(scoped_auth_ref) (\\openstack_auth\\backend.py)" ->
                "scoped_auth, scoped_auth_ref = plugin.get_project_scoped_auth(unscoped_auth, unscoped_auth_ref, recent_project=recent_project)"[label="判断是否该用户在启用的租户中,并获取用户租户认证信息"];
                "scoped_auth, scoped_auth_ref = plugin.get_project_scoped_auth(unscoped_auth, unscoped_auth_ref, recent_project=recent_project)" ->
                "id_endpoints = scoped_auth_ref.service_catalog.get_endpoints(service_type='identity')"[label="获取服务的endpoint信息,也就是各个服务的rest api 接入点信息"];
                "id_endpoints = scoped_auth_ref.service_catalog.get_endpoints(service_type='identity')" ->
                "user = auth_user.create_user_from_token(request, auth_user.Token(scoped_auth_ref, unscoped_token=unscoped_token),
         endpoint,services_region=region_name)"[label="真正创建了keystone 定义的用户模型user对象"];
                "user = auth_user.create_user_from_token(request, auth_user.Token(scoped_auth_ref, unscoped_token=unscoped_token),
         endpoint,services_region=region_name)" ->
                "request.user = user"[label="把user对象赋给request,request获得了真正的user对象"];
                "request.user = user" ->
                "keystone_client_class = utils.get_keystone_client().Client(\\openstack_auth\\backend.py)"[label="初始化keystoneclient,根据配置选择V2或者V3,至此完成user认证,并获得client及endpoint信息"];
                "keystone_client_class = utils.get_keystone_client().Client(\\openstack_auth\\backend.py)" ->
                "def authenticate(self, auth_url=None, \**kwargs) return user(\\openstack_auth\\backend.py)"[label="keystone认证结束,返回django 认证流程"];
                "def authenticate(self, auth_url=None, \**kwargs) return user(\\openstack_auth\\backend.py)" ->
                "def clean forms.ValidationError(\\django\\contrib\\auth\\forms.py)"[label="判断是否获取了用户,如果未获取认证用户,则提示验证失败"];
        "def authenticate(self, auth_url=None, \**kwargs) return user(\\openstack_auth\\backend.py)" ->
        "self.confirm_login_allowed(self.user_cache)(\\django\\contrib\\auth\\forms.py)"[label="判断是否获取了用户,获取认证用户信息,尝试登录"];
                "self.confirm_login_allowed(self.user_cache)(\\django\\contrib\\auth\\forms.py)" -> "判断该用户是否被激活,若没有激活,则体视该用户未被激活,不允许登录";
                "self.confirm_login_allowed(self.user_cache)(\\django\\contrib\\auth\\forms.py)" ->
                "一路按着原调用流程返回,认证结束,跳转初始化页面,正式进入openstack初次登录首页";


                }
Note
能够读懂代码流程的核心:函数调用关系.
Note
能够快速定位代码位置的工具:pycharm
Note
能够快速验证代码参数变化的方法:利用debuglog进行日志跟踪.
问题一:在哪里完成user模型传递: 在 user = _authenticate_with_backend(backend, backend_path, request, credentials)
    class AuthenticationForm(forms.Form):
            """
            Base class for authenticating users. Extend this to get a form that accepts
            username/password logins.
            """
            username = UsernameField(
                    max_length=254,
                    widget=forms.TextInput(attrs={'autofocus': True}),
            )
            password = forms.CharField(
                    label=_("Password"),
                    strip=False,
                    widget=forms.PasswordInput,
            )

            error_messages = {
                    'invalid_login': _(
                            "Please enter a correct %(username)s and password. Note that both "
                            "fields may be case-sensitive."
                    ),
                    'inactive': _("This account is inactive."),
            }

            def __init__(self, request=None, \*args, \**kwargs):
                    """
                    The 'request' parameter is set for custom auth use by subclasses.
                    The form data comes in via the standard 'data' kwarg.
                    """
                    self.request = request
                    self.user_cache = None
                    super(AuthenticationForm, self).__init__(\*args, \**kwargs)

                    # Set the label for the "username" field.
                    self.username_field = UserModel._meta.get_field(UserModel.USERNAME_FIELD)
                    if self.fields['username'].label is None:
                            self.fields['username'].label = capfirst(self.username_field.verbose_name)

            def clean(self):
                    username = self.cleaned_data.get('username')
                    password = self.cleaned_data.get('password')

                    if username is not None and password:
                            self.user_cache = authenticate(self.request, username=username, password=password)# 完成request user 模型转换
                            if self.user_cache is None:
                                    raise forms.ValidationError(
                                            self.error_messages['invalid_login'],
                                            code='invalid_login',
                                            params={'username': self.username_field.verbose_name},
                                    )
                            else:
                                    self.confirm_login_allowed(self.user_cache)

                    return self.cleaned_data

    def authenticate(request=None, \**credentials):
"""
If the given credentials are valid, return a User object.
"""
for backend, backend_path in _get_backends(return_tuples=True):
    try:
                # request = 2020-04-09 06:48:15,989(INFO)novadebug : before _authenticate_with_backend=['__class__', '__delattr__', '__dict__', '__doc__', '__eq__', '__format__', '__getattribute__', '__hash__', '__init__', '__module__', '__ne__', '__new__', '__reduce__', '__reduce_ex__', '__repr__', '__setattr__', '__sizeof__', '__str__', '__subclasshook__', '__unicode__', '__weakref__', '_groups', '_user_permissions', 'check_password', 'delete', 'get_all_permissions', 'get_group_permissions', 'get_username', 'groups', 'has_module_perms', 'has_perm', 'has_perms', 'id', 'is_active', 'is_anonymous', 'is_authenticated', 'is_staff', 'is_superuser', 'pk', 'save', 'set_password', 'user_permissions', 'username']
        user = _authenticate_with_backend(backend, backend_path, request, credentials)
                    # 现在的request.user变为2020-04-09 06:48:30,847(INFO)novadebug : after _authenticate_with_backend=['DoesNotExist', 'Meta', 'MultipleObjectsReturned', 'REQUIRED_FIELDS', 'USERNAME_FIELD', '__class__', '__delattr__', '__dict__', '__doc__', '__eq__', '__format__', '__getattribute__', '__hash__', '__init__', u'__module__', '__ne__', '__new__', '__reduce__', '__reduce_ex__', '__repr__', '__setattr__', '__setstate__', '__sizeof__', '__str__', '__subclasshook__', '__unicode__', '__weakref__', '_authorized_tenants', '_check_column_name_clashes', '_check_field_name_clashes', '_check_fields', '_check_id_field', '_check_index_together', '_check_local_fields', '_check_long_column_names', '_check_m2m_through_same_relationship', '_check_managers', '_check_model', '_check_model_name_db_lookup_clashes', '_check_ordering', '_check_swappable', '_check_unique_together', '_do_insert', '_do_update', '_get_FIELD_display', '_get_next_or_previous_by_FIELD', '_get_next_or_previous_in_order', '_get_pk_val', '_get_unique_checks', '_groups', '_meta', '_perform_date_checks', '_perform_unique_checks', '_save_parents', '_save_table', '_services_region', '_set_pk_val', '_user_permissions', 'authorized_tenants', 'available_services_regions', 'check', 'check_password', 'clean', 'clean_fields', 'date_error_message', 'delete', 'domain_id', 'domain_name', 'enabled', 'endpoint', 'from_db', 'full_clean', 'get_all_permissions', 'get_deferred_fields', 'get_email_field_name', 'get_full_name', 'get_group_permissions', 'get_session_auth_hash', 'get_short_name', 'get_username', 'groups', 'has_a_matching_perm', 'has_module_perms', 'has_perm', 'has_perms', 'has_usable_password', 'id', 'is_active', 'is_anonymous', 'is_authenticated', 'is_federated', 'is_staff', 'is_superuser', 'is_token_expired', 'keystone_user_id', 'last_login', 'natural_key', 'normalize_username', 'objects', 'password', 'password_expires_at', 'pk', 'prepare_database_save', 'project_id', 'project_name', 'refresh_from_db', 'roles', 'save', 'save_base', 'serializable_value', 'service_catalog', 'services_region', 'set_password', 'set_unusable_password', 'tenant_id', 'tenant_name', 'time_until_expiration', 'token', 'unique_error_message', 'unscoped_token', 'user_domain_id', 'user_domain_name', 'user_permissions', 'username', 'validate_unique']
    except PermissionDenied:
        # This backend says to stop in our tracks - this user should not be allowed in at all.
        break
    if user is None:
        continue
    # Annotate the user object with the path of the backend.
    user.backend = backend_path
    return user

# The credentials supplied are invalid to all backends, fire signal
user_login_failed.send(sender=__name__, credentials=_clean_credentials(credentials), request=request)
问题二:backend 从哪里来? 从配置文件中获取;
def _get_backends(return_tuples=False):#django\contrib\auth\__init__.py
        backends = []
        for backend_path in settings.AUTHENTICATION_BACKENDS:
                backend = load_backend(backend_path)
                backends.append((backend, backend_path) if return_tuples else backend)
        if not backends:
                raise ImproperlyConfigured(
                        'No authentication backends have been defined. Does '
                        'AUTHENTICATION_BACKENDS contain anything?'
                )
        return backends

AUTHENTICATION_BACKENDS = ('openstack_auth.backend.KeystoneBackend',)# /usr/lib/python2.7/dist-packages/openstack_dashboard/settings.py
更多的问题,请思考.非常多,不一一点出.
至此,一个带keystone认证的系统框架介绍完毕,实际上读起来有些复杂,用到的知识点非常多,不在此一一介绍,如果能读懂该流程,并进行调试,流程的复杂性,使得读起来比较难以理解,建议带着tip,自己调试,自己思考,自己验证效果会更好,本章节只是引导性指南. 调试完毕后,至少对如下知识点应该会掌握的比较清楚:
# django 框架
# django 路由
# django midddlewares 机制
# django 认证机制
# django backend机制
# openstack 认证流程
# django 转 keystone 认证机制
# django 对象模型
# keystone 认证机制
# keystone token机制
# keystone endpoint机制
# router rest api 路由处理框架
# wsgi基本框架
# 密码密文存储机制
# 密码密文存储匹配机制
# sqlalchemy框架
# sqlalchemy 对象模型
# request 对象
# keystone 用户模型 角色模型  租户模型 域模型 以及权限模型
# openstack 前端元素 dashboard  pannel button tab link action等元素,以及其显示与否与权限的关系.
# 前端框架实际上是从用户端到服务端之间的线路联通,中间的处理过程非常多,除代码流程外,还有很多内容值得思考.
# 认证其实是很有技术难度的事情,值得深思.
# 更多的要了解每个技术框架的设计初衷,以帮助自己开拓思路.
疫情打乱了节奏,使得工作更繁忙,空余时间,完成部分GIFT.
django 如何部署在apache下
python manage.py runserver 0.0.0.0:8000
下正常运行起来了,那么接下来只需要配置apache2 即可
1、安装所需要的软件包:
apt-get install apache2
apt-get install python-django
apt-get install libapache2-mod-wsgi
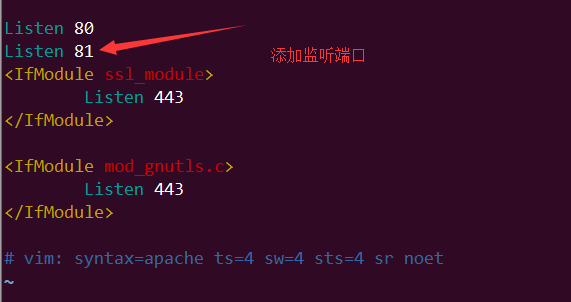
2、修改apache2配置文件,端口情况,这里的端口需要根据自己的需要指定
vi /etc/apache2/ports.conf
添加监听端口
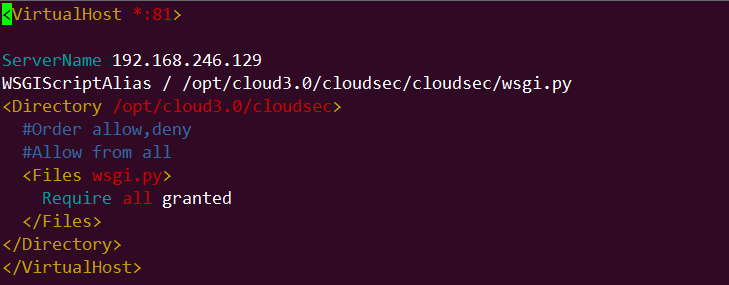
3、添加配置项目,让apache可寻找 django入口
     touch /etc/apache2/sites-avilable/cloudsec.conf
     vi /etc/apche2/sites/avilable/cloudsec.conf
      <VirtualHost \*:81>
       ServerName 192.168.246.129
      WSGIScriptAlias / /opt/cloud3.0/cloudsec/cloudsec/wsgi.py
      <Directory /opt/cloud3.0/cloudsec>
      <Files wsgi.py>
           Require all granted
      </Files>
      </Directory>
      </VirtualHost>
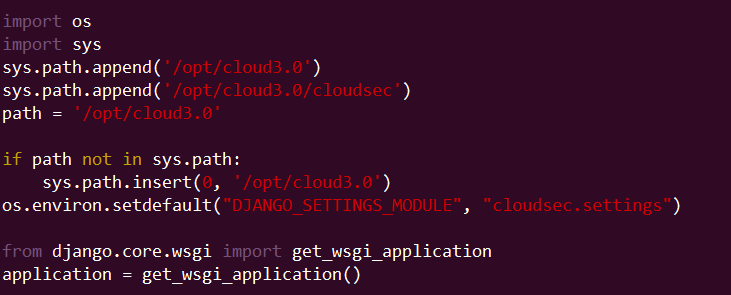
4、修改 /opt/cloud3.0/cloudsec/cloudsec/wsgi.py文件
    新添加
    import sys
    sys.path.append('/opt/cloud3.0')
    sys.path.append('/opt/cloud3.0/cloudsec')
    path = '/opt/cloud3.0'

     if path not in sys.path:
         sys.path.insert(0, '/opt/cloud3.0')
5、令apache2配置生效
    cd /etc/apache2/sites-available
   执行
   sudo a2ensite cloudsec

执行完后 会在 /etc/apache2/sites-enabled下生成软连接文件 cloudsec.conf

6、reload apache2
执行 :
service apache2 reload
每次修改 配置文件都需要 reload
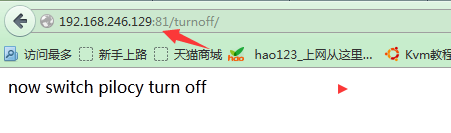
7、重启 apache2 service apache2 restart
8、访问 web
Pecan&Ceilometer.api学习
前端框架是用户与服务端交互的框架流程,服务端提供各类处理能力.有独立部署的服务端,有分布式部署等多种形态,满足一个系统的计算逻辑.后端往往涉及甚多专业技术,由一个或多个对象(服务器、中间件、数据库、逻辑处理单元、分布式计算、异步同步消息处理等等)构成.专业性技术强,综合技术能力要求广泛.
知识引导型阅读().ceilometer-api是ceilometer的RESTAPI网关,其由pecan容器承载基础,类似于keystone的router. ceilometer VRESION. ICEHOUSE. 可以根据该版本查看最新版本的处理逻辑及代码优化过程.
Pecan是一个轻量级的Python web framework,同django一样,可以处理并响应http请求;在ceilometer.api中使用了该框架,处理ceilometerclient中的http请求并响应.本文主要结合ceilometer.api代码介绍Pecan的使用及基本配置;最后给出了一个ceilometer.api原有的基础上实现对web api的扩展的方法;
Pecan was created to fill a void in the Python web-framework world – a very lightweight framework that provides object-dispatch style routing. Pecan does not aim to be a “full stack” framework, and therefore includes no out of the box support for things like sessions or databases (although tutorials are included for integrating these yourself in just a few lines of code). Pecan instead focuses on HTTP itself.
Ceilometer.api架构
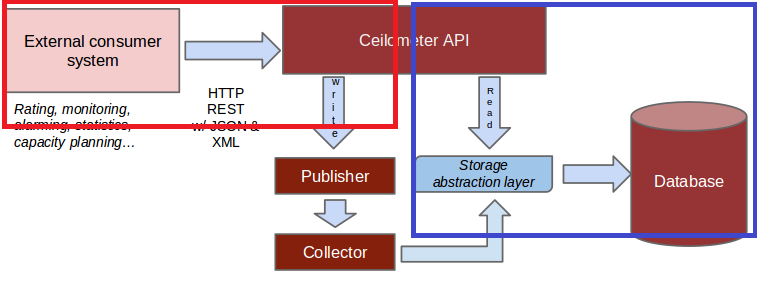
上图中红色部分的工作是由horizon以及ceilometer.client完成的,而蓝色部分是由ceilometer.api以及ceilometer.storage完成的;
上图中的红色部分是由horizon、ceilometerclient、ceilometer.api ceilometers.storage完成的;
Wsgi的一个小例子
具体可参考:http://legacy.python.org/dev/peps/pep-0333/,在此不在赘述.值得深入阅读. 是pecan的主要构成部分.
了解pecan,ceilometerapi处理基础
Pecan的配置信息存储在一个.py文件中,具体到ceilometer.api其配置信息存储在config.py中. Root Controller是整个应用的入口,以ceilometer为例http://localhost:8777的处理请求是由其处理的;在config.py文件中已经指定了Root Controller的路径: 即:ceilometer/api/controllers/root.py
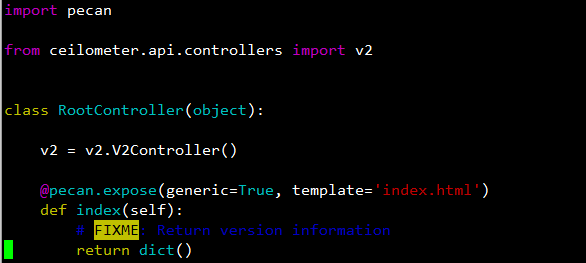
其中 index函数是处理根请求的,如代码所述,如果请求ceilometer的根,并不会得到任何的响应; 该文件主要的功能是路由指定,可以看到v2 = v2.V2Controller()表示如果接收到/v2的请求,将由v2.V2Controller()函数处理; 在ceilometer/api/controllers/v2.py中我们可以看到同样的代码结构:
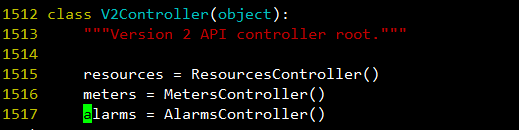
同样的,如果接收到/v2/resources路径,则由ResourcesController()函数处理,/v2/meters函数则由MetersController()函数进行处理,依此类推. 我们将整个ceilometer的顺成关系梳理如下:
import pecan
class RootController(object):
v2 = v2.V2Controller()
@pecan.expose(generic=True, template='index.html')
def index(self):
# FIXME: Return version information
return dict()
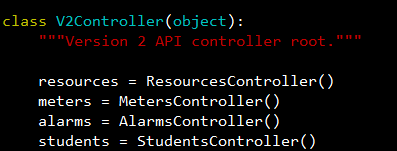
class V2Controller(object):
"""Version 2 API controller root."""
resources = ResourcesController()
meters = MetersController()
alarms = AlarmsController()
class MetersController(rest.RestController):
"""Works on meters."""
@pecan.expose()
def _lookup(self, meter_name, \*remainder):
return MeterController(meter_name), remainder
class MeterController(rest.RestController):
@wsme_pecan.wsexpose([Statistics], [Query], [unicode], int, [Aggregate])
def statistics(self, q=[], groupby=[], period=None, aggregate=[]):{}
这样就可以找到接收到/v2/meter/ statistics的请求的响应函数了; 如我们在命令行中敲入 curl -H ‘X-Auth-Token: <inserttokenhere>’ http://localhost:8777/v2/meters/instance/statistics,其处理过程就是由def statistics(self, q=[], groupby=[], period=None, aggregate=[]):{}函数处理的; ceilometers.api中url路径与Controller的对应关系如下:
-- /                         -- RootController.index
-- /v2                       --V2Controller
-- /v2/meters                -- V2Controller.meters
-- /v2/alarms                -- V2Controller.alarms
-- /v2/resources                 -- V2Controller.resources
--/v2/meters/statistics      -- V2Controller.meters.statistics
Pecan’s Routing Algorithm
有些时候,标准基于对象的路由选择并不能满足应用的需求,Pecan提供了一种灵活的方式处理某些类型的url请求,主要包含如下三个函数即:
- _lookup()
- _default()
- _route()
在ceilometer中便用到了_lookup()函数,便于灵活的满足应用需求;
看下面一个使用 _lookup()函数的例子,便可以知道其作用;他可以更灵活的处理一些url请求; 比如我们需要请求、/8/name的请求,利用_lookup函数可以处理如下:
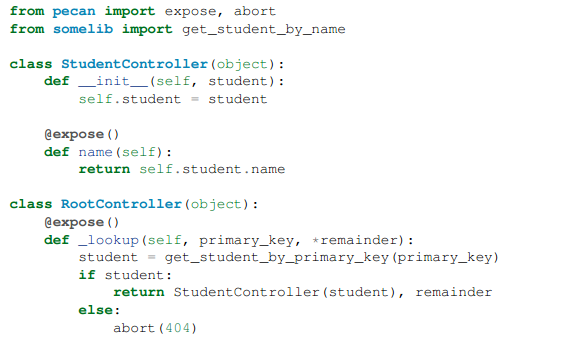
_lookup函数可以接受一个或者多个参数,其参数的来源是根据url获取的,即split on/,以反斜杠之间的信息为参数,该函数为remainder返回一个新的对象;如上代码所述,primar_key接受8这个参数,而*remainder接受“name“参数;该函数为remainder返回StudentController对象; 在ceilometer中也用到了该函数:
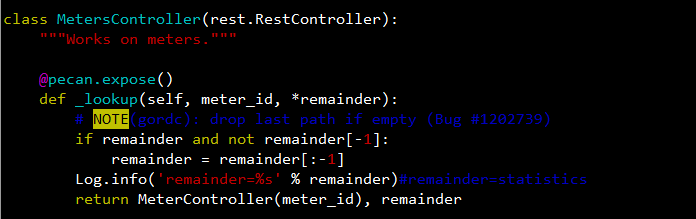
其中remainder数值为statistic;为statistic返回MeterController对象; Falling Back with_default _default()函数的作用是当url的访问请求找不到相应的Controller时,将执行该函数,如下面的例子所示:
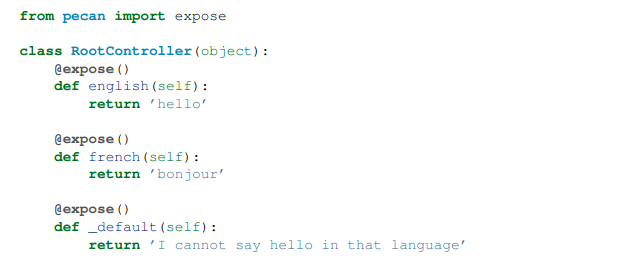
当请求/spanish时,发现没有相应的controller对其处理,则执行RootController._default()函数;
Writing RESTful Web Services with Pecan
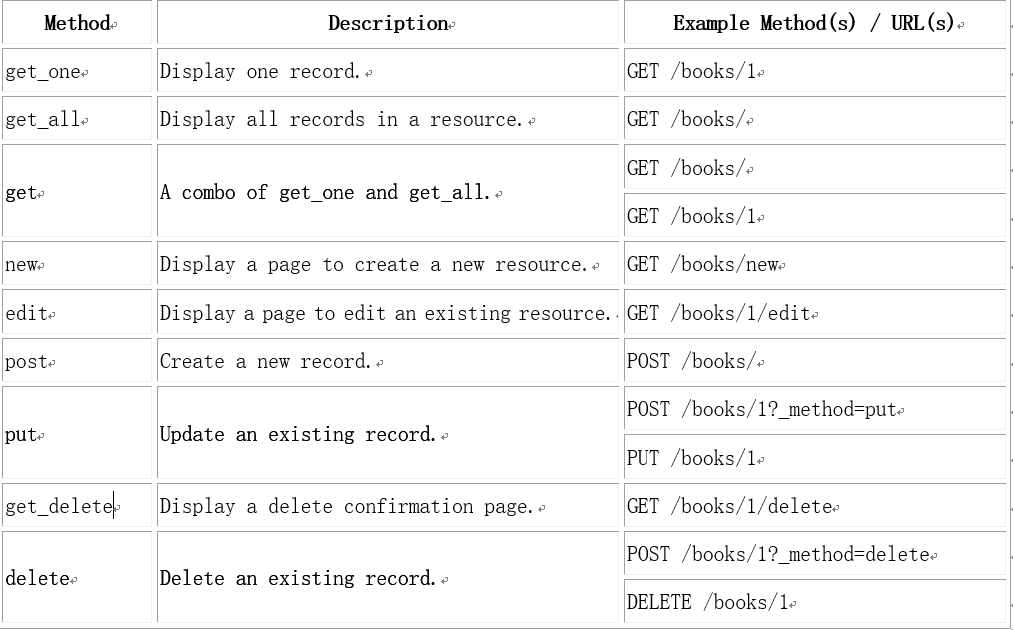
默认的函数与路径的对应关系 使用RestController可以实现与url变量的交互:默认的函数与url的对应关系如下:
一个使用RestController的小例子
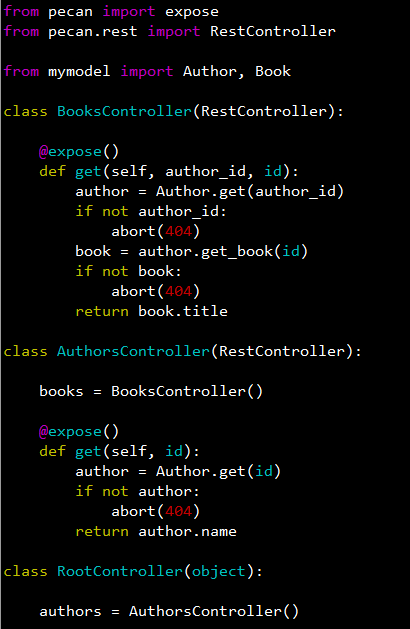
上述代码的可以帮助我们实现如下的功能: 当我们访问/authors/1/books/2时, BooksController.get() 函数可以设置author_id=1, id=2;即实现与url中变量的交互;
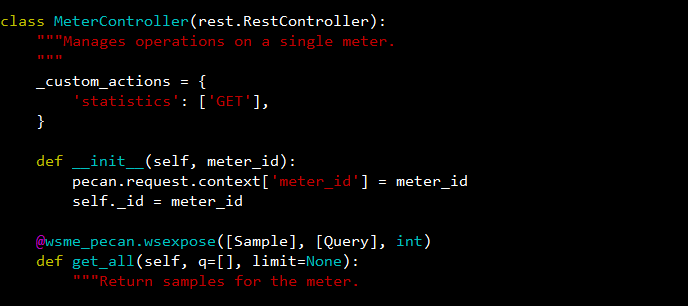
Defining Custom Actions—自定义http请求方法 当我们使用RestController时,可以定义该http请求的方法,在ceilometer.api中也是用了该方法对url的方法进行设置:如/ceilometer/api/controllers/v2文件中的MeterController,设置了该路径下/statistics 请求为GET方法;
如何在ceilometer现有的框架下利用http请求实现对mongo数据库的内容的读取
查询语句的转换过程 Ceilometers.api 中为我们提供了很多很方便的方法,帮助我们封装url的询问请求,下面是一个带询问的url通过ceilometer.api 过程中的格式转换;

图中可以看到http请求的格式,ceilometer中http请求的询问支持如下三种变量即:
- q.op 该查询的操作方法 Enum(lt, le, eq, ne, ge, gt) (小于,小于等于,等于,不等于,大于等于,大于)
- q.field 查询字段
- q.value 查询字段的名称


@wsmeext.pecan.wsexpose()函数是一个装饰器函数,其具体的代码位置在 /usr/lib/python2.7/dist-packages/wsmeext/pecan.py中,主要实现对q的封装; http://simeonfranklin.com/blog/2012/jul/1/python-decorators-in-12-steps/ 上述网页对python装饰器进行了较为详细的介绍.


通过上述几个函数的转换,便可以将查询语句转换为pymongo识别的查询语句;
Ceilometer.storage 存储处单元介绍
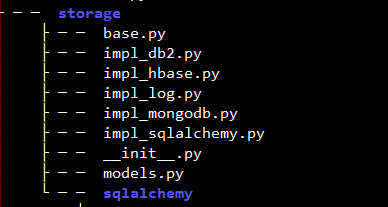
上图是ceilometer.storage所包含的文件,其中impl_*.py虽然文件名称不同,但是功能上是相同的,即为每种数据库定义了适合该数据库的查询方法;现在支持DB2,mongodb,sql以及hbase; 各个文件中的方法名称完全相同; Models.py的主要作用是为各种数据库的查询结果格式化;即封装各类数据库的查询结果;统一将查询结果返回给ceilometer.api;
impl_db2.py     DB2数据库查询
impl_mongodb.py Mongo数据库查询
impl_hbase.py   Hbase数据库查询
impl_sqlalchemy.py      Sql数据库查询
Model.py        负责封装查询结果
在ceilometer.api基础上实现对webapi的扩展
在ceilometer.api的基础上实现对webapi的扩展需要如下五个步骤:
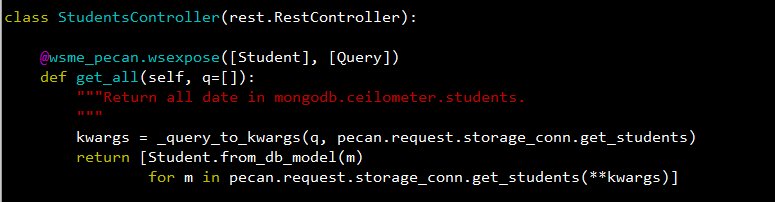
- 在ceilometer.api.controller.v2文件下扩展controller
- 在ceilometer.api.controller.v2编写该controller方法
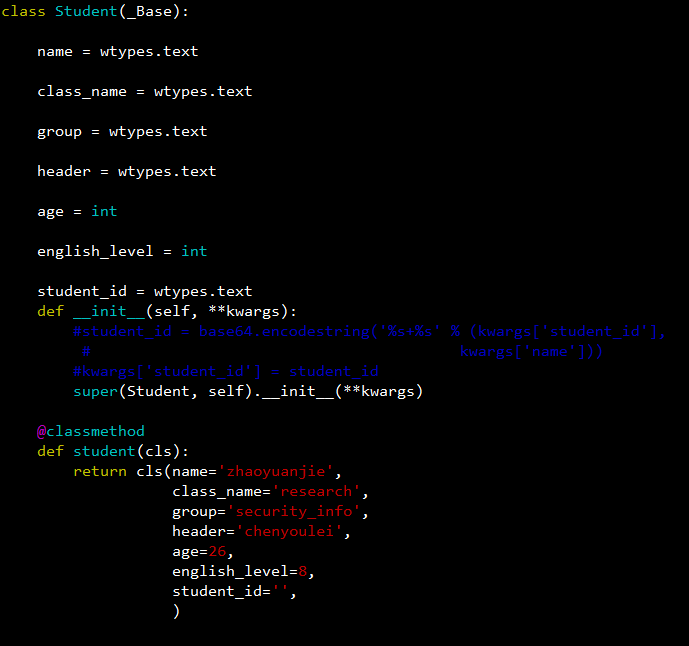
- 在ceilometer.api.controller.v2编写返回数据的格式
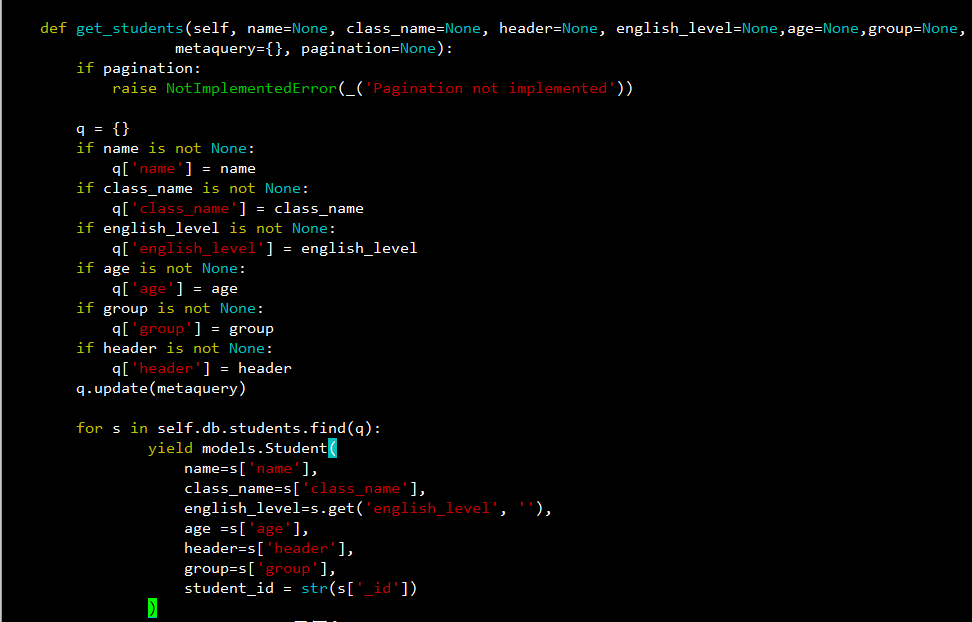
- 在ceilometer.storage.impl_mongodb.py中编写数据库查询方法
- 在ceilometer.storage.model中编写数据库查询结果数据的格式
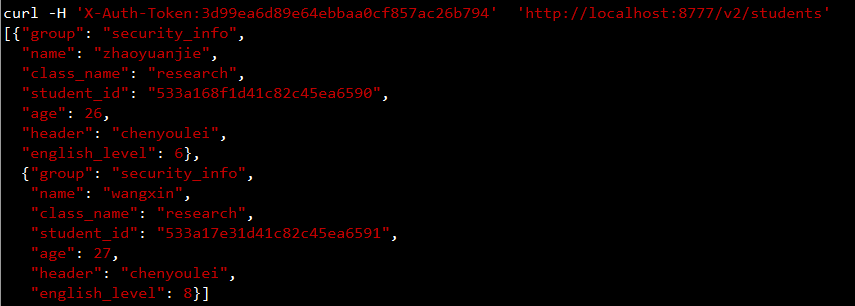
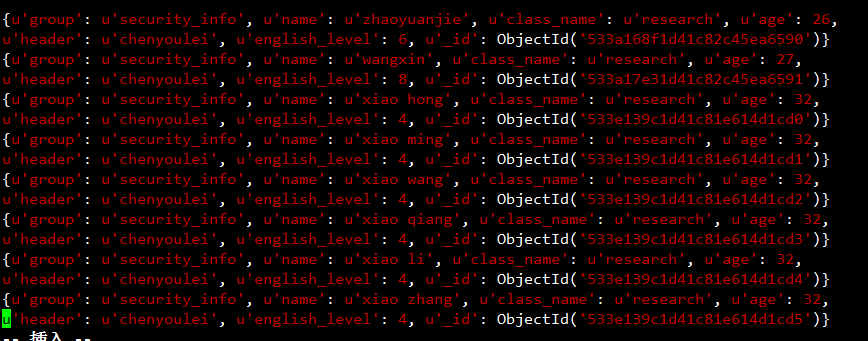
现在假设我们已经在mongodb数据库的ceilometer数据库中创建了一个students的表,并在其中插入了两条记录如下:
{'group': 'security_info',
 'name': 'zhaoyuanjie',
 'class_name': 'research',
 'age': 26,
'header': u'chenyoulei',
'english_level': 6, '_id': ObjectId('533a168f1d41c82c45ea6590')}

{'group': u'security_info',
'name': u'wangxin',
'class_name': u'research',
'age': 27,
'header': u'chenyoulei',
'english_level': 8, u'_id': ObjectId('533a17e31d41c82c45ea6591')}
功能1:通过 http请求curl -H ‘X-Auth-Token:3d99ea6d89e64ebbaa0cf857ac26b794’ ‘http://localhost:8777/v2/students’ 获取mongodb中的全部数据图,或者加询问符合查询的结果图
根据步骤如下:
- 在ceilometer.api.controller.v2文件下扩展controller
- 在ceilometer.api.controller.v2编写该controller方法
- 在ceilometer.api.controller.v2编写返回数据的格式
- 在ceilometer.storage.impl_mongodb.py中编写数据库查询方法
- 在ceilometer.storage.model中编写数据库查询结果数据的格式

添加上述代码到制定的文件便可以达到功能1的需求
Mongo mapreduce 计算
MongoDB 支持使用使用 Map/Reduce 进行并行 “统计”,以提升计算效率,在ceilometer中的统计信息也是通过使用该方法对数据库中的数据进行统计的;具体代码位置在ceilometer.storage.impl_mongo.py中,使用了大量的map/reduce 函数对数据进行统计; Mapreduce 函数返回值类型只接受字符串和字典类型;’out’ must be an instance of basestring or dict
Mapreduce函数参数说明:
•mapreduce: 要操作的目标集合.
•map: 映射函数 (生成键值对序列,作为 reduce 函数参数).
•reduce: 统计函数.
•query: 目标记录过滤.
•sort: 目标记录排序.
•limit: 限制目标记录数量.
•out: 统计结果存放集合 (不指定则使用临时集合,在客户端断开后自动删除).
•keeptemp: 是否保留临时集合.
•finalize: 最终处理函数 (对 reduce 返回结果进行最终整理后存入结果集合).
•scope: 向 map、reduce、finalize 导入外部变量.
•verbose: 显示详细的时间统计信息.
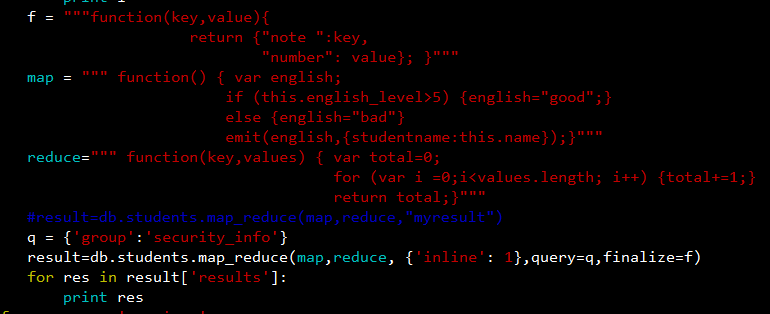
先假设在mongodb库ceilometer数据库中有一张students的表,并有如下数据,现在我们通过简单的mapreduce实例如何统计english_level 大于5 和小于 5 的个数;
1 Map 函数: Map 函数必须调用 emit(key, value) 返回键值对,使用 this 访问当前待处理的 Document;

value 可以使用 JSON Object 传递 (支持多个属性值).如上述的{studentname:this.name}
2 Reduce函数: Reduce 函数接收的参数类似 Group 效果,将 Map 返回的键值序列组合成 { key, [value1, value2, value3, value…] } 传递给 reduce.

如果map函数的输出为:
(1991,1) <--> emit(a,b)
(1991,2) <--> emit(a,b)
(1990,5) <--> emit(a,b)
(1993,3) <--> emit(a,b)
(1993,5) <--> emit(a,b)
(1991,7) <--> emit(a,b)
那么Reduce函数的输入则为:
(1991,[1,2,7]) <---> (key,values)
(1993,[3,5]) <---> (key,values)
(1990,[5]) <---> (key,values)
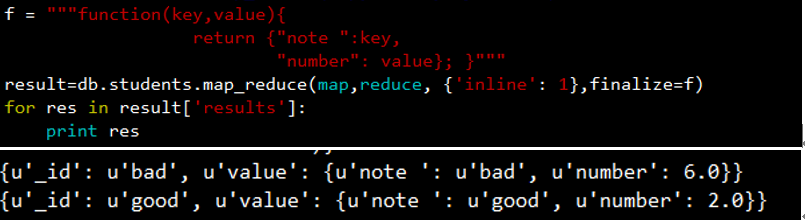
3 Result

Mapreduce()将结果暂时保存在myresult临时集合中;
4 Finalize 利用 finalize() 我们可以对 reduce() 的结果做进一步处理.
5 Options 更多的选项
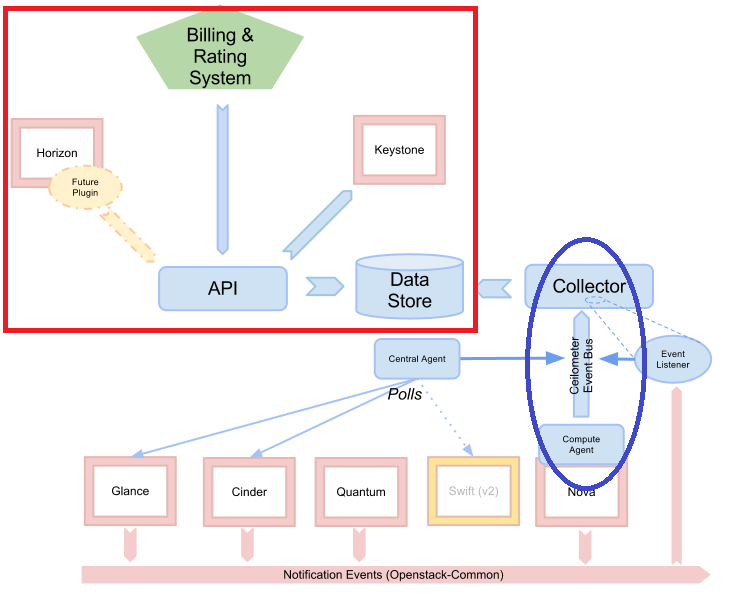
Ceilometer-compute-agent Learning
支撑技术:rabbitmq.

上图的红色部分已经在之前的文档中介绍过;ceilometer.api 事实上是提供了数据库与外部系统的接口,而数据库是连接外部系统与ceilimeter核心组件的连接点;ceilometer的核心在于数据的收集;其数据收集的主要方式分成两种:如图所示,ceilometer写入数据库的信息来源只有一个,即:监听消息总线(message bus)上是数据;而获取的消息总线上的数据来源有两种:
- 通过pollsters机制; 利用插件(agent)获取数据,传输到消息总线中;
- 通过notification messages;该数据主要来源于openstack中的各个组件比如nova,glance,neutron等;
通过这段时间的调研,ceilometer事实上提供了较为灵活的高可配置的数据获取方式: 灵活在于其插件容易扩展;如果我们想要获取额外的meter,只需要写获取该meter的插件即可; 高可配置在于其利用了pipeline机制,该机制可针对每个meter配置其轮询时间,如我们可以通过配置文件配置cpu的轮询时间为10s,也可以配置disk.read.request 的轮询时间为20s;高可配置的另一个原因是其提供的transformer机制仍然是可以配置的,配置之后,自己写相应的transformer函数即可;
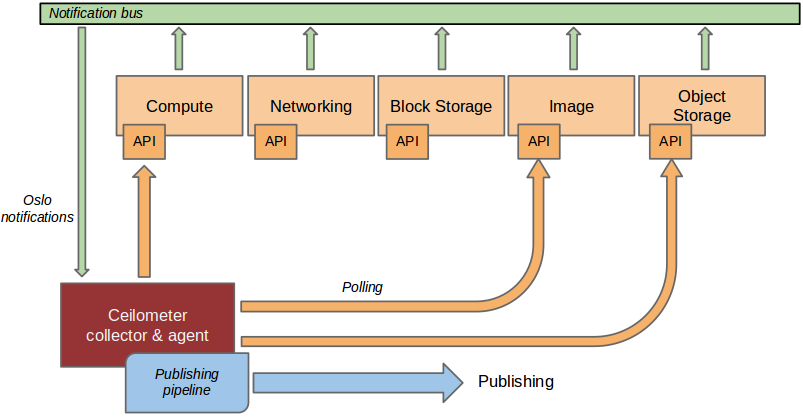
上图展示了collector以及agent从不同的组件中获取数据的流程
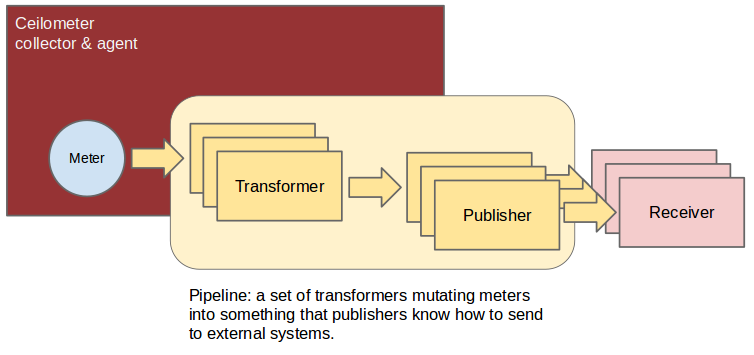
上图展示了ceilometer中的pipeline机制,Pipeline翻译过来是管道的意思,ceilometer中每一个poll task都可以关联一个管道,如上图所示,这里展现了三个管道,每个任务的数据流在自己的管道中进行,ceilometer也是借用这种机制实现对不同meters实现不同轮询的;我们可以看到在每一个管道中前一 部分是transformer,transformer实现数据转换等功能,transformer可以根据我们的配置文件对获取的sample数据进行数据转换,但是具体的要转换成何种方式,需要我们自己扩展transformer函数.在链尾是publisher,它负责将数据发送到AMQP中 去.
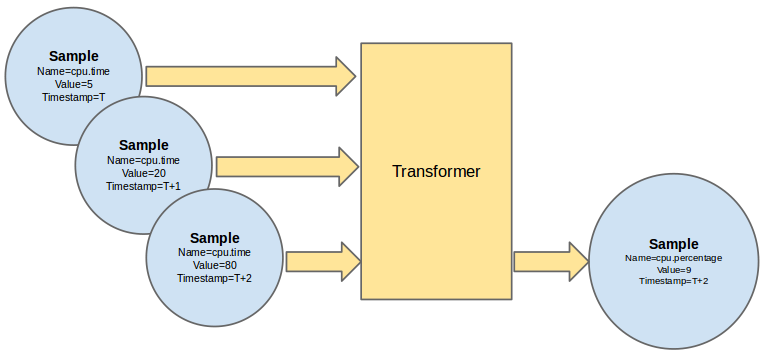
上图展现了ceilometer中transformer的过程,该图可以解释transformer的作用,我们可以看到左侧的sample其meter.name为cpu.time, 该sample经过transformer过程后,其meter.name变为cpu.percentage, 事实上,在现有的ceilometer系统中,通过ceilometer meter-list命令可以看到关于cpu的meter有cpu 以及 cpu_util两个,前者是描述cpu使用时间的sample,而后者是描述cpu利用率的sample; 事实上,这两个meters是来源于同一个sample; cpu_util就是cpu通过 transformer转换而来的;
通过上图可以看出,transformer的作用将cpu meter转换为target为cpu_util的meter,通过transformer 将单位从ns转换为%,name从cpu转换为cpu_util, 将格式从cumulative转换为gauge,图6是transformer的配置文件,其scale是在transformer函数中利用cpu 使用时间计算cpu利用率所需要的数值;
Ceilometers各服务安装方式
在控制节点安装ceilometer-api、ceilometers-collector、ceilometers-agent-central 在计算节点安装ceilometer-agent-compute 由此可以看出,计算节点上代码只有ceilometer.compute.manager开始驱动;
Ceilometer模块代码结构及概述
Ceilometer 主要组件的代码在ceilometer文件夹中;
ceilometer-2time.egg-info文件对我们扩展插件非常重要
ceilometerclient文件夹之前已经介绍过,用于封装ceilometer api使用
ceilometer核心模块代码结构
其中:
1)      Agent 为 所有agent的父类,即ceilometer-agent-compute agent的父类以及 ceilometers-central的父类
2)      Compute 为ceilometers-agent-compute代码所在位置,负责获取虚拟机数据(nova)
3)      Central、image、energy、objectstore、network、volume 为ceilometer-agent-central 代码所在位置,负责获取除nova组件之外的组件信息
4)      Transformer 为ceilometer transformer机制所在位置,负责对sample数据进行transformer过程
5)      Publisher 为ceilometer Publisher机制所在位置,负责推送sample至amqp中去;
6)      Plungin 所有插件的父类
7)      Nova_client 从nova中获取相应数据,主要是获取虚拟机信息,即libvirt.xml中的数据
8)      Samples sample的父类
9)      Pileline ceilometer中pipeline机制实现过程
10)     Storage 针对各类数据库读写操作
11)     Openstack 该文件中内容非常多,可以将其理解为一个工具集,ceilometer中用到的很多工具如amqp、udp 相关服务等都在这里
12)     Api ceilometers-api 路由寻址过程,数据提取查询过程
13)     Alarm 告警功能
ceilometer-xx.egg-info 该文件是在ceilometer安装时生成的,ceilometer插件之所以很方便的扩展是因为其利用了一种动态加载模块的机制 (stevedore->python 动态扩展包),http://stevedore.readthedocs.org/en/latest/patterns_enabling.html 我们可以看一下其中的entry_points文件:
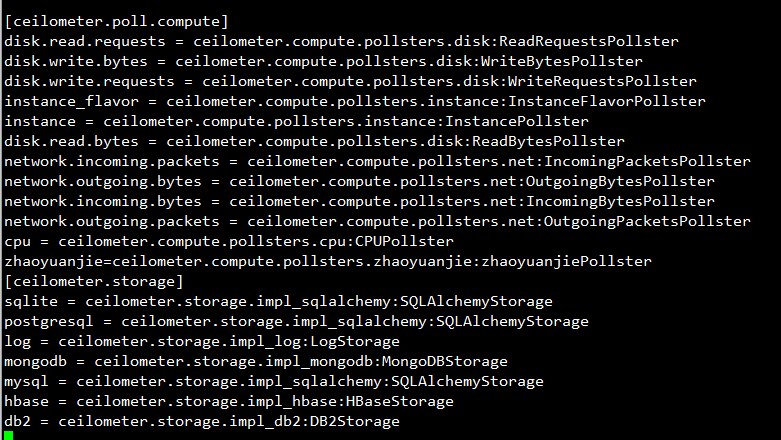
该文件指明了每一个模块的代码入口,如disk.read.requests = ceilometer.compute.pollsters.disk:ReadRequestsPollster 即说明disk.read.requests的 pollseter入口为ceilometer.compute.pollsters.disk:ReadRequestsPollster;更详细的介绍可以看 http://pythonhosted.org/setuptools/setuptools.html#dynamic-discovery-of-services-and-plugins
- Manager文件为ceilometer-agent-compute的入口函数
- Notification为ceilometer监听消息总线数据并格式化过程
- Plugin为pollsters各类插件的父类
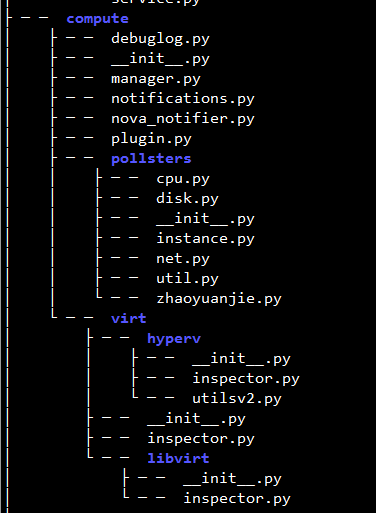
- Pollsters文件夹中包含了每一个pollster,及插件,获取cpu的插件,获取disk的插件,获取instance的插件,获取net的插件,其中的文件util为封装sample数据用;
- Virt文件为具体获取数据的代码,其中的inspecotor文件中会读取配置文件中的信息,来获取使用哪种方式获取虚拟数据,默认的选择l利用ibvirt获取数据,同时提供了另一种即利用hyperv获取数据的方式;其中的/ceilometer/compute/virt/libvirt/inspector.py中定义了具体获取虚拟机数据的函数;
每次启动ceilometer-compute 的命令为 Service ceilometer-agent-compute restart 因此,服务的入口在/usr/bin目录下的ceilometer-agent-compute文件
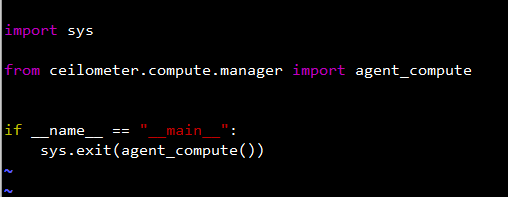
从导入的函数中得知,启动函数为compute.manager.agent_compute函数 查看下/usr/share/pyshared/ceilometer/compute/ manager.py 文件中的agent_compute函数,便可以知道整个polling的过程

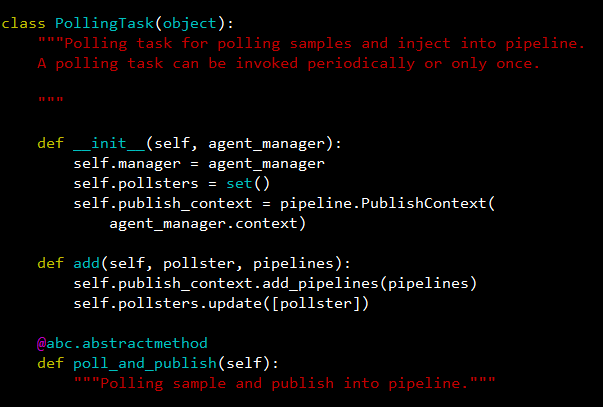
该函数的父类来自ceilometer.agent, 重点看一下create_polling_task函数:
该函数继承自ceilometer.agent.Polling函数;
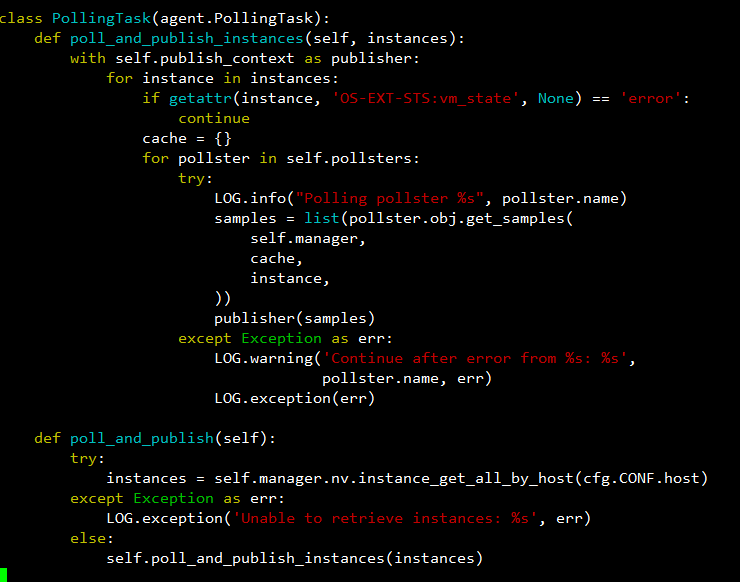
其父类函数的polling_and_publish为空,执行本身的函数,自身函数的polling_and_publish中通过nova_client获取了该物理机上的所有虚拟机信息,这便是polling过程所需要的全部信息;其返回函数为poll_and_publish_instances:
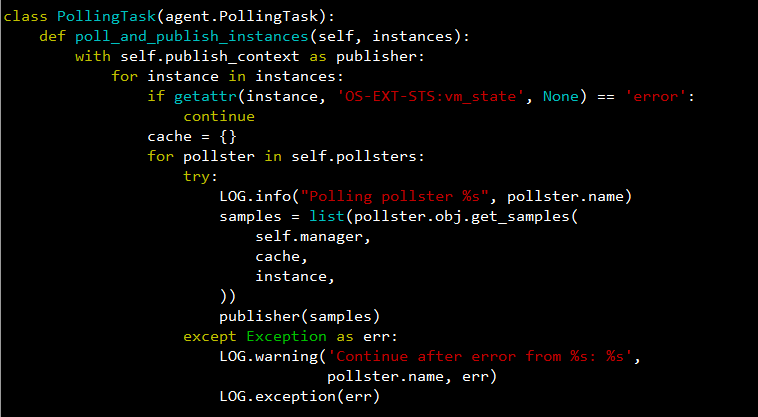
看该函数应该清楚ceilometer的数据流程了,polling过程结束后,直接publisher samples,而publisher是由with self.publish_context as publisher而来,事实上,是送入上述的管道,管道就两个过程,一个是transformer过程,另一个便是publish到数据总线;具体过程可以查看ceilometer.pipeline函数,该函数的作用便是构造管道函数;
可以重点考虑下如何实现一个插件? homework.
后续
rabbitmq值得去细化了解,了解分布式处理机制,了解消息高可用处理机制
了解ceilometer notification 的设计初衷
了解消息的封装
ceilometer compute给出了不同服务之间消息处理的基本框架
ceilometer polling机制给出了一个定时处理任务的框架
ceilometer api 给出了后端处理rest api的框架
ceilometer compute 代码中包含虚拟化监测技术的实现流程
各处理单元均高度抽象及模块化,值得学习借鉴
内容略粗糙,指引性内容,供参考.

Note
Wish You All The Best. Be Happy. Again.