ElasticSearch安装
单机版本安装
安装环境:ubuntu_16.04+elasticsearch-6.2.4+java_8u191 前置条件:安装java 单机版本安装步骤 1.获取软件安装包。点此获得软件包下载地址.
Note
当前安装测试部署阶段使用的版本为6.2.4。
2.解压软件包到安装目录,设置的安装目录为/opt。
#root@ubuntu:/home/cecgw# tar -xzvf elasticsearch-6.2.4.tar.gz -C /opt/
- 创建ES用户和组,修改文件访问权限。为了es运行安全,从5.0之后的版本禁止使用 root 用户启动es。详情可查看。https://www.elastic.co/guide/en/elasticsearch/reference/6.6/modules-scripting-security.html.
# groupadd elasticsearch
# useradd elasticsearch -g elasticsearch
# chown -R  elasticsearch:elasticsearch /opt/elasticsearch-6.2.4
Note
First and foremost, never run Elasticsearch as the root user as this would allow any successful effort to circumvent the other security layers to do anything on your server. Elasticsearch will refuse to start if it detects that it is running as root but this is so important that it is worth double and triple checking.
- 配置ES信息。ES的配置文件在es安装目录下的config文件夹中,主要包括:elasticsearch.yml配置Elasticsearch, jvm.options配置Elasticsearch JVM设置, log4j2.properties配置Elasticsearch日志记录。
elasticsearch.yml主要配置项如下:
cluster.name: elastic-cluster-1
node.name: elastic-cluster-1-node-1
path.data: /opt/esdata 配置后注意该文件权限,调整为 elasticsearch执行权限。# chown -R elasticsearch:elasticsearch /opt/esdata
path.logs: /var/log/elasticsearch 配置后注意该文件权限,调整为 elasticsearch执行权限。chown -R elasticsearch:elasticsearch /var/log/elasticsearch
network.host: 10.10.10.10
http.port: 9200
设置JVM选项(包括系统属性和JVM标志)通过jvm.options配置文件,这个文件的默认位置是config/jvm.options. jvm的配置建议,可点此查看。 https://www.elastic.co/guide/en/elasticsearch/reference/6.6/heap-size.html. 默认情况下,Elasticsearch告诉JVM使用最小和最大大小为1 GB的堆。在转移到生产环境时,重要的是配置堆大小,以确保Elasticsearch有足够的堆可用。 ES主要通过Xms (minimum heap size) 和 Xmx (maximum heap size) 配置ES堆设置。这些设置的值取决于服务器上可用RAM的数量。好的经验法则是:
- 设置最小堆大小(Xms)和最大堆大小(Xmx)相等。
- Elasticsearch可用的堆越多,用于缓存的内存就越多。但是请注意,过多的堆会导致长时间的垃圾收集暂停。
- 将Xmx设置为不超过物理RAM的50%,以确保有足够的物理RAM留给内核文件系统缓存。
jvm配置项说明可点此查看详情 https://www.elastic.co/guide/en/elasticsearch/reference/6.6/jvm-options.html.
Note
点此查看详情 https://www.elastic.co/guide/en/elasticsearch/reference/6.6/jvm-options.html. 以-开头的行被视为独立于JVM版本的JVM选项,如 -Xmx2g。 以数字开头、后跟:、后跟-开头的行被视为只有在JVM版本与数字匹配时才适用的JVM选项,如 8:-Xmx2g。 以数字开头、后跟-、后跟:的行被视为只有当JVM版本大于或等于数字时才适用的JVM选项,如 8-:-Xmx2g。 以数字开头、后跟-、再跟数字、再跟:的行被视为只有当JVM的版本在两个数字的范围内时才适用的JVM选项,如 8-9:-Xmx2g。
建议根据硬件配置,以及该服务器上安装软件的情况,合理配置ES,测试电脑为6G, 设置jvm -Xms3g,-Xmx3g.
5. 调整操作系统参数。详情可查看`<https://www.elastic.co/guide/en/elasticsearch/reference/6.6/setting-system-settings.html>`_. 主要的参数为ulimit参数。在Linux系统上,可以使用ulimit临时更改资源限制。
* soft nofile 65536
* hard nofile 131072
* soft nproc 2048
* hard nproc 4096
Note
Ubuntu忽略了这些限制。编辑/etc/pam.d/su和取消注释如下行: # session required pam_limits.so
- 启动程序。切换到elasticsearch用户,启动ES.
su elasticsearch
elasticsearch@ubuntu:/opt/elasticsearch-6.2.4$ ./bin/elasticsearch -d
elasticsearch@ubuntu:/opt/elasticsearch-6.2.4$ ps -aux|grep elasti
root      12846  0.2  0.1  55776 11752 pts/3    S+   13:56   0:11 vi elasticsearch-install.rst
root      13041  0.0  0.0  48908  3436 pts/7    S    15:06   0:00 su elasticsearch
elastic+  13042  0.0  0.0  19912  3744 pts/7    S    15:06   0:00 bash
elastic+  13099 97.9 13.7 3785592 837492 pts/7  Sl   15:07   0:09 /usr/lib/jdk/bin/java -Xms3g -Xmx3g -XX:+UseConcMarkSweepGC -XX:CMSInitiatingOccupancyFraction=75 -XX:+UseCMSInitiatingOccupancyOnly -XX:+AlwaysPreTouch -Xss1m -Djava.awt.headless=true -Dfile.encoding=UTF-8 -Djna.nosys=true -XX:-OmitStackTraceInFastThrow -Dio.netty.noUnsafe=true -Dio.netty.noKeySetOptimization=true -Dio.netty.recycler.maxCapacityPerThread=0 -Dlog4j.shutdownHookEnabled=false -Dlog4j2.disable.jmx=true -Djava.io.tmpdir=/tmp/elasticsearch.ZJf8mMJK -XX:+HeapDumpOnOutOfMemoryError -XX:+PrintGCDetails -XX:+PrintGCDateStamps -XX:+PrintTenuringDistribution -XX:+PrintGCApplicationStoppedTime -Xloggc:logs/gc.log -XX:+UseGCLogFileRotation -XX:NumberOfGCLogFiles=32 -XX:GCLogFileSize=64m -Des.path.home=/opt/elasticsearch-6.2.4 -Des.path.conf=/opt/elasticsearch-6.2.4/config -cp /opt/elasticsearch-6.2.4/lib/* org.elasticsearch.bootstrap.Elasticsearch -d
- 测试验证。注意curl的ip地址为在elasticsearch.yml中配置network.host,es 9200端口仅对该IP开放,如果需要对所有的IP开放,可配置该IP为0.0.0.0.
elasticsearch@ubuntu:/opt/elasticsearch-6.2.4$ curl http://10.10.10.10:9200
{
  "name" : "elastic-cluster-1-node-1",
  "cluster_name" : "elastic-cluster-1",
  "cluster_uuid" : "9JY9--VEQ16meBv0CKFI8A",
  "version" : {
    "number" : "6.2.4",
    "build_hash" : "ccec39f",
    "build_date" : "2018-04-12T20:37:28.497551Z",
    "build_snapshot" : false,
    "lucene_version" : "7.2.1",
    "minimum_wire_compatibility_version" : "5.6.0",
    "minimum_index_compatibility_version" : "5.0.0"
  },
  "tagline" : "You Know, for Search"
}
分布式安装
安装环境:ubuntu_16.04+elasticsearch-6.7.0.tar.gz+java_8u191 前置条件:安装java 分布式版本安装步骤
  node                      IP                       roles
 master                 17.17.17.2                 master,data
slaver-1                17.17.17.4                 master,data
slaver-2                17.17.17.5                  master,data
1.获取软件安装包。点此获得软件包下载地址.
Note
当前安装测试部署阶段使用的版本为6.7.0。
2.解压软件包到安装目录,设置的安装目录为/opt。
#root@ubuntu:/home/cecgw# tar -xzvf elasticsearch-6.7.0.tar.gz -C /opt/
3. 创建ES用户和组,修改文件访问权限。为了es运行安全,从5.0之后的版本禁止使用 root 用户启动es。详情可查看。https://www.elastic.co/guide/en/elasticsearch/reference/6.6/modules-scripting-security.html. 本实验中我们默认使用hadoop-1用户启动elasticsearch.
# root@master:/opt# chown -R hadoop-1:hadoop-1 elasticsearch-6.7.0
Note
First and foremost, never run Elasticsearch as the root user as this would allow any successful effort to circumvent the other security layers to do anything on your server. Elasticsearch will refuse to start if it detects that it is running as root but this is so important that it is worth double and triple checking.
- 配置ES信息。ES的配置文件在es安装目录下的config文件夹中,主要包括:elasticsearch.yml配置Elasticsearch, jvm.options配置Elasticsearch JVM设置, log4j2.properties配置Elasticsearch日志记录。
elasticsearch.yml主要配置项如下:
grep -vE  '^#|^$' elasticsearch.yml
    cluster.name: es-cluster-1
    node.name: master
    path.data: /opt/esdata  配置后注意该文件权限,调整为 elasticsearch执行权限。# chown -R hadoop-1:hadoop-1 /opt/esdata
    path.logs: /var/log/elasticsearch 配置后注意该文件权限,调整为 elasticsearch执行权限。chown -R hadoop-1:hadoop-1 /var/log/elasticsearch
    network.host: 17.17.17.2
    http.port: 9200
    discovery.zen.ping.unicast.hosts: ["17.17.17.2", "17.17.17.4", "17.17.17.5"] #设置集群中master节点的初始列表,可以通过这些节点来自动发现新加入集群的节点
    discovery.zen.minimum_master_nodes: 2 #设置这个参数来保证集群中的节点可以知道其它N个有master资格的节点。默认为1,对于大的集群来说,可以设置大一点的值(2-4)
    # 是否支持跨域
    http.cors.enabled: true

    # *表示支持所有域名供EShead使用。
    http.cors.allow-origin: "*"
设置JVM选项(包括系统属性和JVM标志)通过jvm.options配置文件,这个文件的默认位置是config/jvm.options. jvm的配置建议,可点此查看。 https://www.elastic.co/guide/en/elasticsearch/reference/6.6/heap-size.html. 默认情况下,Elasticsearch告诉JVM使用最小和最大大小为1 GB的堆。在转移到生产环境时,重要的是配置堆大小,以确保Elasticsearch有足够的堆可用。 ES主要通过Xms (minimum heap size) 和 Xmx (maximum heap size) 配置ES堆设置。这些设置的值取决于服务器上可用RAM的数量。好的经验法则是:
- 设置最小堆大小(Xms)和最大堆大小(Xmx)相等。
- Elasticsearch可用的堆越多,用于缓存的内存就越多。但是请注意,过多的堆会导致长时间的垃圾收集暂停。
- 将Xmx设置为不超过物理RAM的50%,以确保有足够的物理RAM留给内核文件系统缓存。
jvm配置项说明可点此查看详情 https://www.elastic.co/guide/en/elasticsearch/reference/6.6/jvm-options.html.
Note
点此查看详情 https://www.elastic.co/guide/en/elasticsearch/reference/6.6/jvm-options.html. 以-开头的行被视为独立于JVM版本的JVM选项,如 -Xmx2g。 以数字开头、后跟:、后跟-开头的行被视为只有在JVM版本与数字匹配时才适用的JVM选项,如 8:-Xmx2g。 以数字开头、后跟-、后跟:的行被视为只有当JVM版本大于或等于数字时才适用的JVM选项,如 8-:-Xmx2g。 以数字开头、后跟-、再跟数字、再跟:的行被视为只有当JVM的版本在两个数字的范围内时才适用的JVM选项,如 8-9:-Xmx2g。
建议根据硬件配置,以及该服务器上安装软件的情况,合理配置ES,测试电脑为6G, 设置jvm -Xms6g,-Xmx6g.
5. 调整操作系统参数。详情可查看`<https://www.elastic.co/guide/en/elasticsearch/reference/6.6/setting-system-settings.html>`_. 主要的参数为ulimit参数。在Linux系统上,可以使用ulimit临时更改资源限制。 修改/etc/security/limits.conf下参数。
* soft nofile 65536
* hard nofile 131072
* soft nproc 2048
* hard nproc 4096
vi /etc/sysctl.conf

#改打开文件数量
vm.max_map_count=655360
运行 sysctl -p 命令,使这些系统参数生效。
Note
Ubuntu忽略了这些限制。编辑/etc/pam.d/su和取消注释如下行: # session required pam_limits.so
- 启动程序。切换到hadoop-1用户,启动ES.
su elasticsearch
elasticsearch@ubuntu:/opt/elasticsearch-6.2.4$ ./bin/elasticsearch -d
elasticsearch@ubuntu:/opt/elasticsearch-6.2.4$ ps -aux|grep elasti
root      12846  0.2  0.1  55776 11752 pts/3    S+   13:56   0:11 vi elasticsearch-install.rst
root      13041  0.0  0.0  48908  3436 pts/7    S    15:06   0:00 su elasticsearch
elastic+  13042  0.0  0.0  19912  3744 pts/7    S    15:06   0:00 bash
elastic+  13099 97.9 13.7 3785592 837492 pts/7  Sl   15:07   0:09 /usr/lib/jdk/bin/java -Xms6g -Xmx6g -XX:+UseConcMarkSweepGC -XX:CMSInitiatingOccupancyFraction=75 -XX:+UseCMSInitiatingOccupancyOnly -XX:+AlwaysPreTouch -Xss1m -Djava.awt.headless=true -Dfile.encoding=UTF-8 -Djna.nosys=true -XX:-OmitStackTraceInFastThrow -Dio.netty.noUnsafe=true -Dio.netty.noKeySetOptimization=true -Dio.netty.recycler.maxCapacityPerThread=0 -Dlog4j.shutdownHookEnabled=false -Dlog4j2.disable.jmx=true -Djava.io.tmpdir=/tmp/elasticsearch.ZJf8mMJK -XX:+HeapDumpOnOutOfMemoryError -XX:+PrintGCDetails -XX:+PrintGCDateStamps -XX:+PrintTenuringDistribution -XX:+PrintGCApplicationStoppedTime -Xloggc:logs/gc.log -XX:+UseGCLogFileRotation -XX:NumberOfGCLogFiles=32 -XX:GCLogFileSize=64m -Des.path.home=/opt/elasticsearch-6.2.4 -Des.path.conf=/opt/elasticsearch-6.2.4/config -cp /opt/elasticsearch-6.2.4/lib/* org.elasticsearch.bootstrap.Elasticsearch -d
- 测试验证。注意curl的ip地址为在elasticsearch.yml中配置network.host,es 9200端口仅对该IP开放,如果需要对所有的IP开放,可配置该IP为0.0.0.0.
hadoop-1@master:/opt/elasticsearch-6.7.0$ curl http://17.17.17.2:9200
{
  "name" : "master",
  "cluster_name" : "es-cluster-1",
  "cluster_uuid" : "sTB07r6eQd2ECauYex2QDA",
  "version" : {
        "number" : "6.7.0",
        "build_flavor" : "default",
        "build_type" : "tar",
        "build_hash" : "8453f77",
        "build_date" : "2019-03-21T15:32:29.844721Z",
        "build_snapshot" : false,
        "lucene_version" : "7.7.0",
        "minimum_wire_compatibility_version" : "5.6.0",
        "minimum_index_compatibility_version" : "5.0.0"
  },
  "tagline" : "You Know, for Search"
}
8 给ES动态增加节点。 1、在新增节点上安装java环境; 2、新增节点增加es用户; 3、将软件包拷贝至新增节点,并解压到安装目录。
root@slaver-2:/opt# scp -r elasticsearch-6.7.0/  ubuntu@slaver-3:/home/ubuntu/
root@slaver-3:/opt# chown -R hadoop-1:hadoop-1 elasticsearch-6.7.0
root@slaver-3:/opt# mkdir /opt/esdata
root@slaver-3:/opt# mkdir /var/log/elasticsearch
root@slaver-3:/opt# chown -R  hadoop-1:hadoop-1 /opt/esdata/
root@slaver-3:/opt# chown -R  hadoop-1:hadoop-1 /var/log/elasticsearch/
4、修改系统配置文件;
调整操作系统参数。详情可查看`<https://www.elastic.co/guide/en/elasticsearch/reference/6.6/setting-system-settings.html>`_. 主要的参数为ulimit参数。在Linux系统上,可以使用ulimit临时更改资源限制。 修改/etc/security/limits.conf下参数。
* soft nofile 65536
* hard nofile 131072
* soft nproc 4096
* hard nproc 4096
vi /etc/sysctl.conf

#改打开文件数量
vm.max_map_count=655360
运行 sysctl -p 命令,使这些系统参数生效。
Note
Ubuntu忽略了这些限制。编辑/etc/pam.d/su和取消注释如下行: # session required pam_limits.so
5、修改cesticsearc配置文件;
主要包括config elasticsearch.yml文件以及根据机器配置,修改jvm.options文件。
6、使用es用户启动该节点es节点。
7、使用该IP 9200端口查看服务状态。
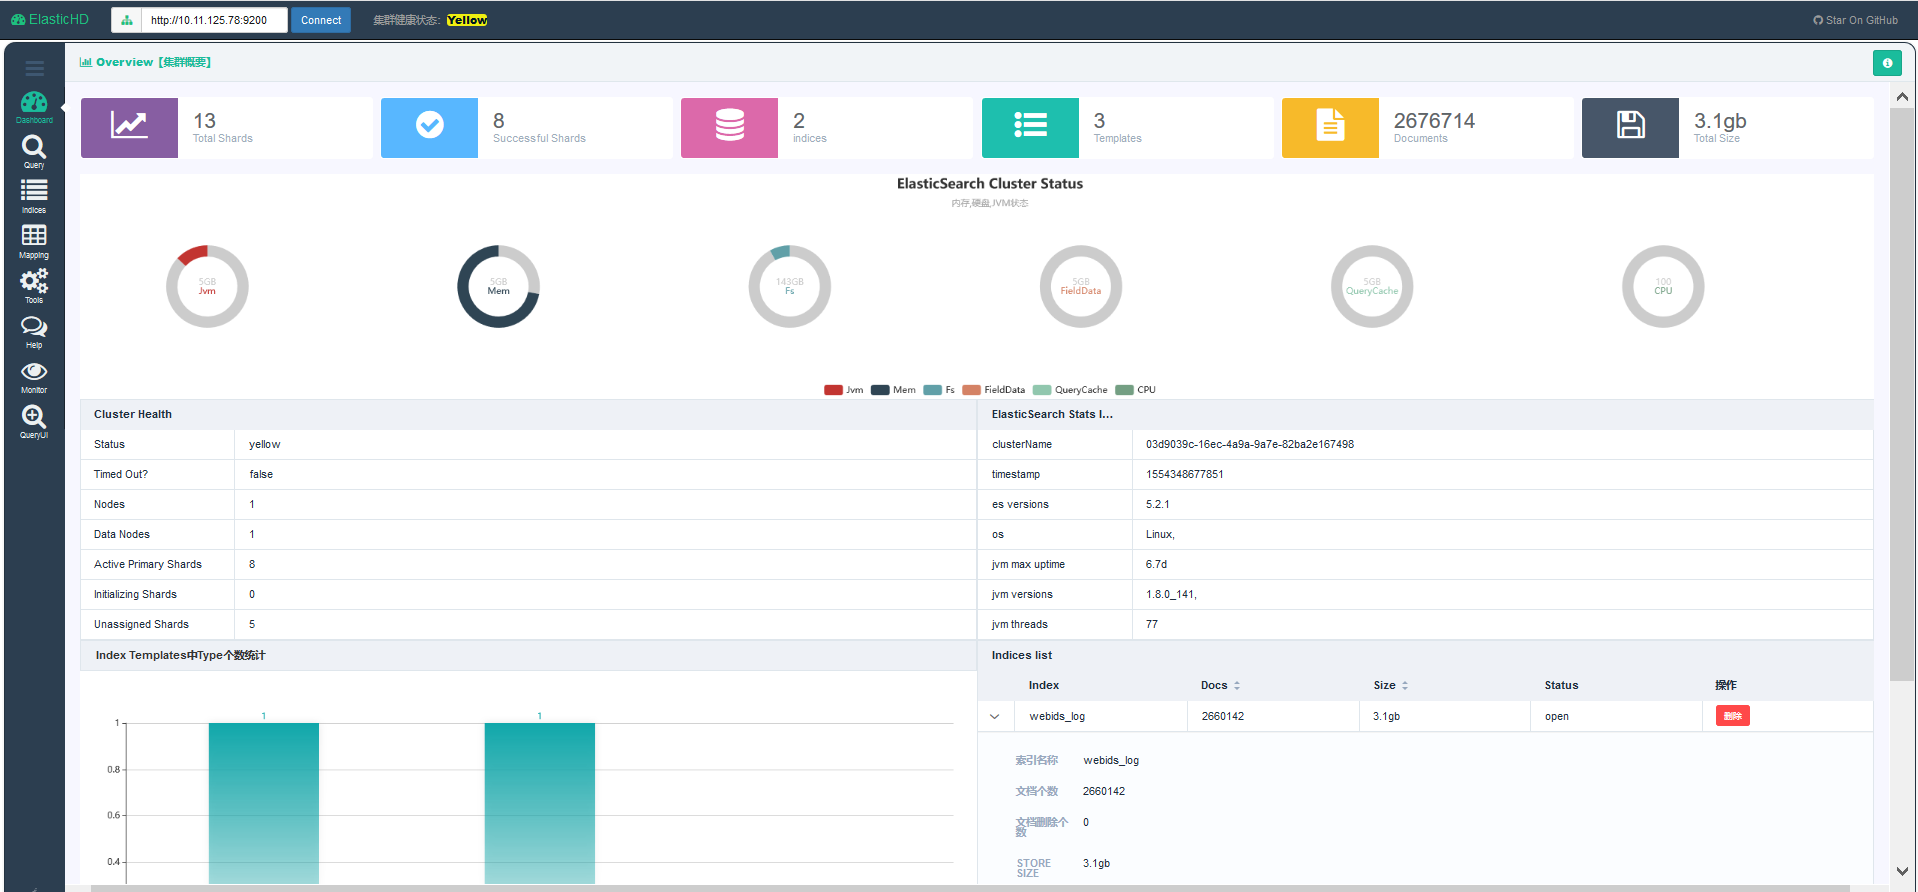
ES监控插件
ElasticHD 支持 ES监控、实时搜索,Index template快捷替换修改,索引列表信息查看, SQL converts to DSL工具等, 项目地址为: https://github.com/360EntSecGroup-Skylar/ElasticHD
1. 首先下载zip压缩包:https://github.com/360EntSecGroup-Skylar/ElasticHD/releases/
2. 修改权限:chmod -R 777 ElasticHD
3. 运行: nohup ./ElasticHD -p 0.0.0.0:9800 & >/dev/null 2>&1
可通过浏览器访问查看相关监控信息。
Note
Pre-version。